Monday, February 28, 2011

Breaking news...

My LOVE pillow is a finalist in the Sew, Mama, Sew pillow contest.  Today is the ONLY day to vote, so PLEASE go and VOTE!!!


All you need is LOVE


More celebrating of my BOY.


It all started last week when I made these cute pants for George.  Then I looked through the shirts that I salvaged from the Italian's giveaway pile, and decided that I could make George some new dress slacks with some old dress shirts.

These shirts to be exact.


The Italian wasn't too sure about the color of these pants, but I think my little boy was the best dressed at church today.  I mean I am a little biased, but I'm pretty positive you'd agree he looks cute.


I used the same concept that I learned from making Anna Maria Horner's Quick Change Trousers, so they are completely reversible.  Maybe George will wear these pants next week for a whole new look.  I used the AMH pattern as my guide, but I used the pattern pieces I made last Thursday.


I also added a little whale on the left leg because as I told you before my last name in Italian means "whale."  I wish I'd put the whale a little higher up on the leg, but my boy was asleep when I was sewing these pants, so I had to do some guess work.  Next time I'll know.

Grace joined George in wearing a handmade outfit to church today.  She sported her Bow Shirt and Pleated Skirt.


Grace really likes to model.  Hopefully she can pass along all her good poses to George.


I love that these pants were dressy enough for church, but cozy enough to play in.  I think that was George's favorite part too.


I'm loving celebrating my BOY.  I still have some more shirts waiting to be reused, so we'll see what the week holds.  My mom is here visiting and she has lots of requests, so who knows what's up next!

Friday, February 25, 2011

Old Shirt, New Pants


It's Celebrate the Boy Month, and I decided that George needed to be celebrated hear at MOM a little.  I mean the poor kid rarely gets handmade things from me.  He was due a treat from me!


Earlier this week the Italian was going to get ride of a knit shirt that I've always liked, but he's never liked the fit.  I told him I'd keep it, and yesterday I was hit with inspiration.  I thought they'd make cute, comfortable pants.  

So, I took a pair of George's pants that fit him and traced a front leg and a back.


Then I cut the Italian's shirt in half (front and back pieces).


Folded each half right sides together and then cut two front leg pieces and two back leg pieces.


Match front leg curved center seam right side together and sew with 1/2 inch seam allowance.  Then serge.  If you don't have a serger you can zig zag stitch and trim the excess seam allowance, OR if you are using knit like I did, you can just trim the extra seam allowance.  Knit doesn't fray like quilter cotton.  Repeat this to the back leg curved center seam.


Then sew outer legs together.


And inner legs.


I finished each leg cuff by serging them.  You could just leave them cut if you use knit because like I said it doesn't fray.


Then I serged the top of the pants to make an elastic casing for the waistband, and folded down the top of the pants an inch wrong side together.  Sewed all around the casing leaving a 2 inch open to put the elastic in.  Then sew the elastic together and close the opening.  (Sorry there are no pictures!!!  George was too excited to put his new pants on.)


And, the final product


is so cute if you ask me.  


This stripes don't match up perfectly.  I would have tried harder if I had bought new fabric off a bolt, but I had limited fabric from the old shirt, so I had to go with it.  I also had to be okay with the logo showing on the back bottom leg.  It is my husband's favorite store, so I'm okay with it and I think he will be too!

George was so excited that he got new pants, and even more excited that they came from his dad's old shirt.


I think the pants kind of have a nautical look to them, and they also look so comfy.  Lounge wear for my little boy.  I love it.


Grace was a wee bit jealous.  She asked me if I could make her a pair of new pants out of an old shirt of her dad's.  I reminded her I just made her a new bow shirt and skirt.  


George just ran and ran around in his new pants.  I've got several more shirts that were about to be donated that I've stashed, and now I've got all sorts of ideas of things to make for my BOYS!!


Have a good weekend!  Sew on friends!  Sew on!

Thursday, February 24, 2011

Sewing Soiree hits the East Coast

I was rather jealous of Liz's intimate Sewing Night a few weeks back.  I decided if I could not attend hers, then I'd just have to host my own.  It was so much fun, I have a feeling we'll be needing to do it again soon.


Lots of machines, a couple of babies, lots of ladies, a few snacks, a late night of sewing.  What more could a girl hope for?!


Some were inserting zippers into pillow backs for the first time!  


Some were making their very first zipper pouches.  Lots of zipper-foot attachements were getting used for the first time.   There was quilt cutting, tie making, a Go-To Dress in the works, and even a Circle Skirt being constructed. It was really a night full of excitement.


As for me, I spent more time chatting and visiting, and guiding a zipper insertion or two, to be able to bust out my own project.  But I did not regret that for a moment.  My own project is one full of instructions and tulle and satin, and layers, and is not something to approach casually.  I found a quiet hour this afternoon where I worked through a few more steps of construction.  It's going to be a dress to behold when it's done.


And Liz told me it's never too late to wrap up a special present from MOM.  For that reason, I feel completely justified in leaving the birthday banner hanging for just a few more days.

Until the next Sewing Soiree ladies...it was more fun than I deserved to have a on  Tuesday night!  Thanks.  

Wednesday, February 23, 2011

One Yard Wonder: Pleated Skirt


I found these adorable tights at Target on sale for $2.74.  As I stood in Target contemplating whether or not Grace needed another pair of tights I started going over in my head what she would wear with them.  We have a plethora of pink clothing in this house, but purple doesn't seem to be all that popular.  Then it hit me that I could just sew her up a little number that would go with the tights.  I mean you can't pass up tights that are only $2.74!!


I was going to go with a different fabric from my stash that had purple in it, but my new Anna Maria Horner Innocent Crush fabric kept calling my name.  I've been so nervous to cut into it, because I don't have much of it. In the end, I told myself I could use the fabric so long as I used a pattern I knew I could make work.

I've made the pleated skirt from the One Yard Wonder book once before, and it is super easy and doesn't disappoint.  The only variation I made from the pattern was adding a second fabric below the rick rack.  I thought it was a nice way to get some extra color in the outfit.  An outfit can never have too much color as far as I'm concerned!


I did end up needing to add an extra pleat in the front (there are only supposed to be 4, but Grace's skirt has 5), but you would never know that unless I told you or you wrote the pattern or you've sewn the pattern.  I'm pretty positive this was my error, but I'm not too sad about it.


I also didn't hand stitch waist casing closed like the instruction say to because I don't have that kind of patience late at night especially on a simple skirt.


And, if you have this book and make this skirt, the one critique I have about that pattern is how they tell you to add the embellishment.  I add my embellishment (in this skirt the rick rack) before I sew up the front of the skirt to the back, so you don't see the start and finish of where I added the rick rack.  The pattern tells you to wait until after the skirt is completed and as the last step you can add the embellishment.  I guess it comes down to personal preference.


If you read MOM yesterday day, you'd know that I made The Bow Shirt (and tutorial) to go with this skirt.  Sorry for the big tease.  But The Bow Shirt is pretty awesome if you ask me, and so is the Pleated Skirt, so I thought they deserved two separate posts.


Sorry for the dirty fountain in the background, but I was too consumed with this hilarious pose to see that when I snapped the shot.

While this skirt is very simple, my love affair with Anna Maria Horner's fabrics continue as I think this skirt is so much fancier with her beautiful fabric.  I totally *heart* Innocent Crush and my little model!


And now you've seen the complete look.  It's an early night here at MOM West Coast.  I haven't sewn anything, and I'm contemplating going to bed before 10:30 p.m.  My doctor would approve and probably the Italian would too!

Tuesday, February 22, 2011

Bow Shirt Tutorial


Bows seem to be all over the place these days.  You've seen all the cute bow bags made with Annee's wonderful Bow Bag Tutorial.  Annee and I have both made Bow Pillows.  And you can find bow on shirts, skirts, bags, headbands, etc. all over the place.

Two summers ago Annee and her kids flew from Korea to CA and stayed with me for a couple of days.  Even though Annee was completely jet lagged, we got the crazy idea of recreating this shirt


I got from Anthropologie several years ago.  I should have the picture to share of Annee and me in our matching shirts, but I fear the picture was taken on Annee's camera, and I'm not calling her at this hour!

Annee made a bow shirt for Jane back in the fall, and I decided over the weekend that Grace needed one too.

Then I thought maybe our readers would like to know how to make their own bow shirts.  They are so easy, and they are way cute on little girls.  I promise they can be chic on an adult too.  I can't fit in my bow shirt currently, so you'll have to use your imagination.

If you want to make a bow shirt, get ready.  Here we go!

You'll need the following:

-PDF PATTERN for the 4 BOW SHIRT PIECES - Okay, I'm trying to be tech savvy, but this isn't my best PDF.  I did a pattern for toddlers and adults.  However, in the scanning process the adult pattern got mixed up with the toddler pattern.  When you make your shirt, just make sure you get the 4 pieces that say *toddler* if you are making a shirt for a kid, or *adult* if your shirt is for an adult.

-shirt

-fabric - less than a fat quarter

-pinking shears (optional, but you'd really love these if you had them!)

-threads, pins, sewing machine, iron - the basics!

First cut out your four pieces with pinking shears.


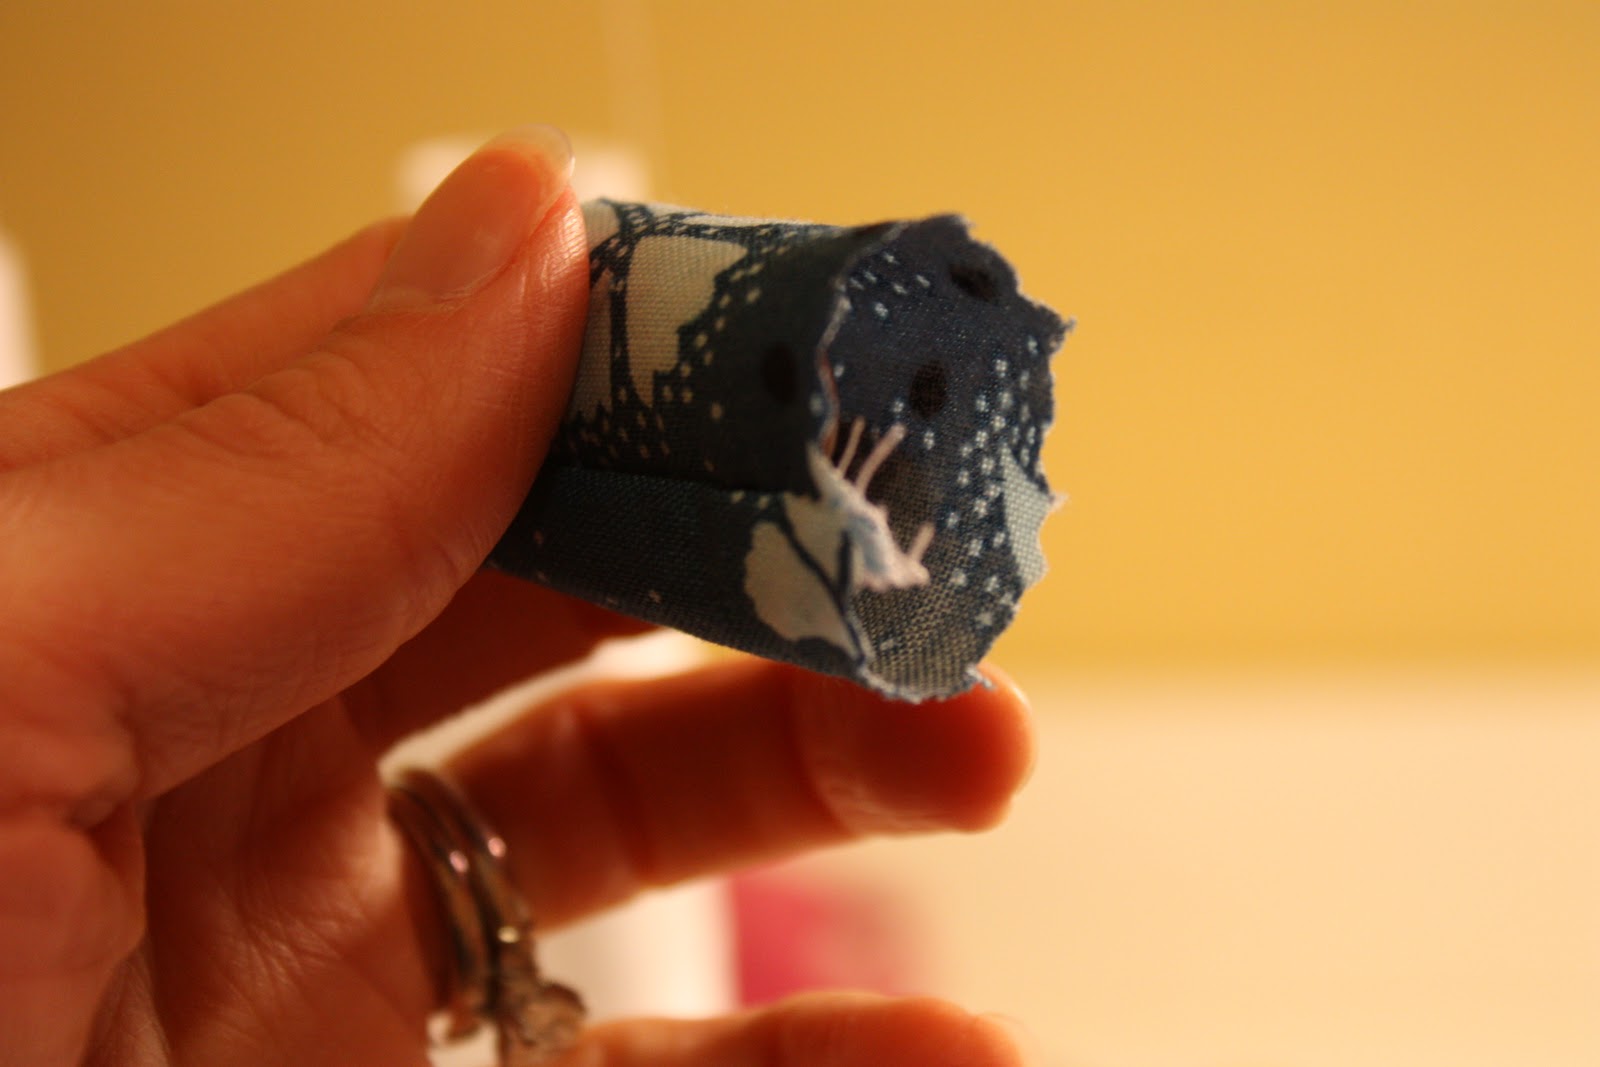
Next you'll make your bow knot.  Fold it in half short sides together.  Right sides together.  Sew together with 1/2 inch seam allowance.


Then serger, zigzag stitch, pinking shears or press seam open.


Turn bow knot right side out.


Bow knot is done!

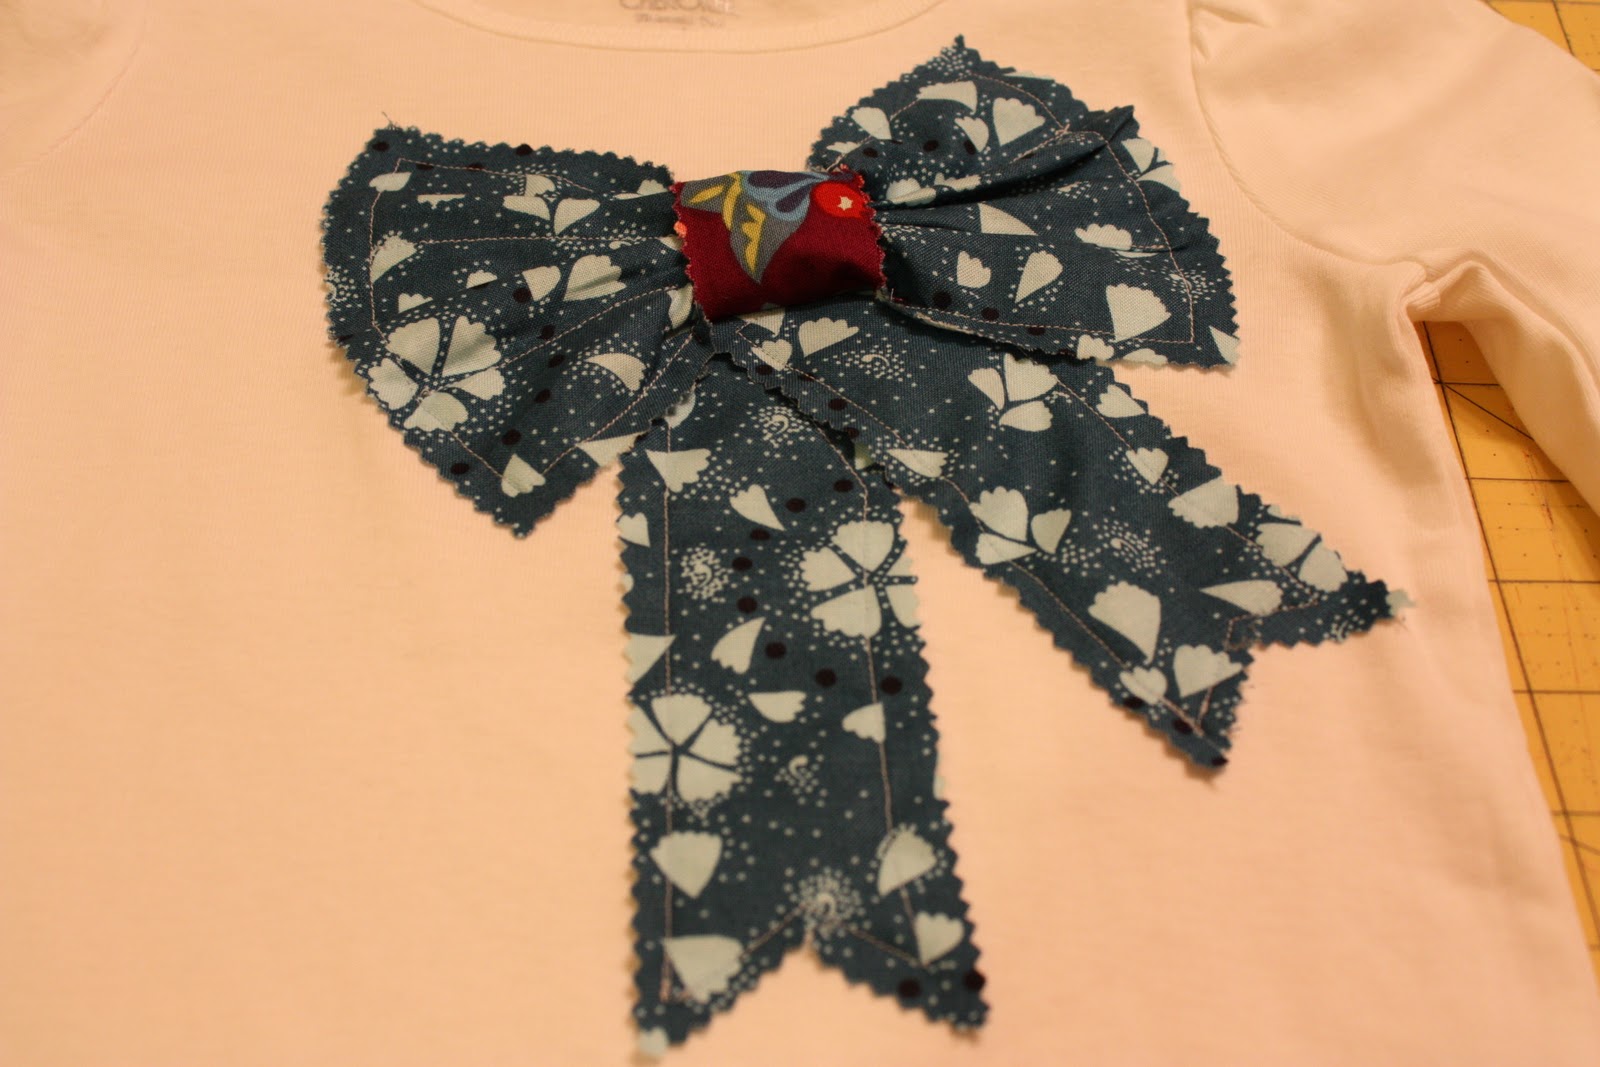
Now take the bow body and using your iron make some pleats.  Nothing too perfect.  Just a couple of creases.


Next squeeze the bow body through the bow knot.


Lay all the pieces out on your shirt.  This is rather critical especially if are making a shirt for an adult.  I don't think most ladies want a bow cross their chest.  I off center the bow closer to the right side of my shirts, and I overlap the sashes angling out the smaller one.


When I laid out my bow, I decided that I wanted something different for the bow knot, so I changed my fabric.  Sorry for the confusion!


Now I didn't use iron-on adhesive.  I don't really have a reason why I don't, so you can use it if you want, or you can use tons of pins.  They work just as well.


I start by pinning and then sewing the bow sashes.  I sew about a 1/4 inch from the sides.


Next I sew down the bow body.  Pins are your friends, so use them generously.


I sew around both sides of the bow body backstitching when I get to the bow knot.  The bow knot never gets sewn down to the shirt.


Once I've sewn the perimeter of both sides of the bow body, then I go back and sew two additional lines on both sides of the bow body.  I start on the outer edge of the bow body and sew toward the bow knot.  Backstitch both at ends.


Clip all your strings, and you are done!  It's that easy.  And your little one, or big one, will be so happy with their new shirt.


It's perfect for frolicking in the park


smelling flowers


and just being girly!


Come back tomorrow, and I'll show your the skirt that I made to go with Grace's bow shirt.  For now I'm off to bed.  A pregnant woman needs her sleep!!
Related Posts Plugin for WordPress, Blogger...