Sunday, January 26, 2014

Caravan Shoppe and Olliblocks


After moving to the South, I went to go and see my friend Summer who introduced me to the Caravan Shoppe.  I talked about it in one of my previous posts, and I've seen their Olliblocks all over the internet, but I thought they would be too tricky or pricey to make.  Then Summer educated me on how simple and inexpensive they were to make.


I think a normal person would have just done one or two sets of Olliblocks to see how hard they are and how long they would take.  Of course I'm not normal, so I took on making 10 Olliblocks people (30 blocks).  It was a bit of a labor of love, but seriously they are so cute and worth it.


I made two sets of the girls, the monsters, the superheros, the boys, and the animals.  Each of these sets are a one time purchase (the starter pack includes the boys, girls, and animals), and then you can print them as many times as your hands desire to do all the many steps it takes to complete these darling blocks.  On the Caravan Shoppe blog, they recommend using blocks from Craftparts online.  I made one perpetual with blocks from Hobby Lobby, and quickly purchased 50 blocks from Craftparts because the quality of the Hobby Lobby blocks were horrible.  I think I got a splinter from one of the blocks.  My other hot tip is regarding Modge Podge.  I was a school teacher many years ago, and I bought a bottle of Modge Podge that lasted me 4 years, and I used it for several different projects with my students.  Modge Podge is to be used very sparingly.  A little goes a long way.  I've now made 40 blocks with the bottle I have, and it's still very full.


It was quite a site making all of these.  Oh, and since I was already into this project pretty deeply, I decided to throw in making a perpetual calendar as well.


I love this little calendar and so do my kids.  They like to change it.  I think it reminds them of doing calendar time at school.


 Then I tested out the blocks on my little one, and he thought these blocks were such fun.


I'm sad I didn't get his eyes in this shot, but I think you can see that he's totally loving the Olliblocks.


He's going to be so happy when he gets his own set.


For Valentine's Day I decided that each of my kids will get 2 Olliblock dolls (6 blocks).  I couldn't just give them the blocks, so I made drawstring bags.  This was another hot tip from Summer.  She's just full of good ideas!  This was the Lined Drawstring Bag Tutorial I used, and it's fabulous!


This tutorial was crazy easy and fast.  Once I had all my fabrics cut for 5 bags, I sewed all 5 bags from start to finish in 2 1/2 hours.  That's pretty speedy.  This was such a genius way of constructing a bag.  I will definitely make more of these in the future.  


I do 14 days of Valentine's for my kids, and I this will be day 14's Valentine.  Now I only have 13 more to come up with.  Thank goodness for Pinterest!


Sorry just a couple more pictures of the blocks because they are that cute and deserve a couple extra shots.


Off to trace an Oliver + S pattern.  I only have 3 new ones to try, so I've got to get busy!
Sunday, January 19, 2014

Oliver + S School Photo Dress

During Winter Break 2011 Annee and I met up at my parents house, where I'm currently living, to oohed and aahed over my 7 month old (then and now 2 1/2) chubby little man, Hank.  While she was here we both traced the pattern pieces to the School Photo Dress onto freezer paper.  I also remember her then talking of wanting one more little baby in her family.  She's totally lucky and got two! Ha!


While Annee was here we also journeyed to Hobby Lobby and I found this hot pink and brown narrow wale corduroy on sale.  I'm a sucker for hot pink and for sales, so I bought 2 1/2 yds for the School Photo Dress even though I didn't have the pattern with me and wasn't quite sure of the exact requirements for the dress.


Then 2 years went by.  What?!  How does that happen?!  I actually know how that happens.  Life happens.  Darn time.  Can we just stop it somehow?!  I never used those pattern pieces that I traced and cut.  A couple of weeks ago, Annee sewed up her own School Photo Dress, and I knew I could do it too.  Sewing is such a mind game where you second guess your skill set and worry about things you haven't even come across in a pattern you haven't even read.  I mean I've only sewn like 100+ dresses why would I not think I could sew this one.  After seeing Annee's version, I quickly found my pattern check the fabric requirements, realized I still had enough fabric to make Grace a dress, and got my freezer paper and started tracing.  No wasting time!


This pattern is rated 3 scissors out of 4.  I've also sewn the Oliver + S Jump Rope dress that is 3 scissors (or is it 4) and I think this one is easier.  There were just lots of steps, but nothing was super tricky.


I made the size 8 dress and was going to lengthen it to size 10 because these patterns tend to be short.  However, I cut every body piece to the size 10 length except for one.  Oops.  In the end it was a good mistake because the dress is plenty long.


I also didn't make a single trip to the fabric store for this dress other than the one I took 2 years ago, so the lining is white.  You can't see it, but if you stand next to Grace you catch a glimpse of it on the neckline.  Oh, well.  It's really not a big deal, but brown lining would have made it more professional which I'm totally trying to be. Wink, wink.  Oh, but my model she is totally professional and kept her poses even when the wind blew her hair in her face. 


The back has an invisible zipper which I really love because some of the Oliver + S patterns call for buttons down the back.  Zippers can be tricky but are less tricky than buttons if you ask me.


It's totally invisible, but if I had had enough fabric and wanted to be more professional, I guess I could have lined up those polka dots.


All in all, I'm so happy with this dress.  Even before I was finished with it I'd purchased another Oliver + S  pattern because I was reminded while sewing this pattern just how well written and thorough Liesl's patterns are.  I've joked with Annee that this is the year of Oliver + S, and I'm really hoping that's not just a joke.  I don't have many more years of sewing dresses for Grace, so I really should take advantage of the time while I have it.  Not to mention I have actually purchased 3 new Oliver + S patterns since I made this little number.  Fingers crossed I actually use them and soon!

Tuesday, January 14, 2014

Oliver & S Sailboat extravaganza...

Liz, said I had something that would "blow your mind".  I don't know if I would have billed it so highly myself, but since she said I'd be here, here I am!  Maybe 2014 will see a great return to blogging?!!  Certainly we never stop making, but finding the time and the balance with the making, and the life living, and the blogging, it just gets so complicated!

Dear readers, as you will recall, 16 months ago I had my second set of twins, bringing my total kid-count up to SIX.  I keep myself busy 24 hours a day, 7 days a week.  I dream of my bed and sleep, and sleeping for days on end, on a regular basis.  But these babies are killing me with their cuteness!  They serve as little toddling bundles of inspiration.  I knew that I wanted to find more ways to make them "matching".  It seems to amuse me to no end.  And, I've had a hankering to challenge myself in the sewing world.  To remind myself what my mind and hands really are capable of.

Enter, Oliver&S patterns.  I've sewn my fair share over the years.  Who hasn't.  But I will reveal, that I am NOT a huge fan of the investment of time that they require.  Liz and I have pages of texts back and forth when an O&S pattern is in the works, about how painfully long they take.  True, the finished product is always spectacular (if you chose your fabrics correctly).  True, the fit is always delightful.  True, the sewing instructions are clear and wonderful. True, if the pattern involves a zipper and lining, you will likely be forced to do some dreaded hand-sewing as your last step!  True, I swear off O&S patterns, only to come back to them again and again.  I hope that someday I will get so totally speedy that I can just sew one without lamenting the amount of time it will require!  So, that is why, in 2014 you may see me making them over and over again in an attempt to get faster!  I can only keep sewing in my life if in fact, making a dress does NOT take twelve total hours of time!

Without further ado, here's what I came up with for my Dynamic Duo this past week!


Whenever I make an O&S pattern, I do search online first for bloggers who are sharing any details about the fit, pattern, etc. they discovered as they sewed.  Since I am always searching for that info myself, I will add to the collective knowledge for a moment:

I did lengthen the pant pattern pieces.  I lined up my pieces along their ankles, then I cut them apart about halfway between the crotch and the ankle.  I inserted two inches, then pieced them back together.  It turns out that was the perfect amount to add for Wally.  They hit him perfectly across the top of his foot.  But, I had to hem them pretty tight, and they might become too short pretty quickly.  So, I will savor these pictures and have them wear these outfits again before too long.

That was the only alteration I made to the pattern.  Otherwise, Wally is wearing all of the size 2 pieces.  And Eleanor is wearing the 18-24 month.  There was a pretty good difference between those two sizes, and my babies are about five pounds apart.  The shirts are kind of hard to get on.  They are narrow, so to wiggles their little arms up into the sleeves, isn't exactly fun.  But once the shirts are on, I think they fit really well.  I might add another inch or inch and a half in length to the shirts, next time around.  But otherwise, I wouldn't change a thing.

Hope you like making button holes if you choose this pattern.  In case you were counting, that is 16 buttonholes, and 16 buttons!  I REALLY need to figure out how the Bernina will sew those buttons on for me.  That took way too long one night.

You guys!  I'm a huge fan of these ensemble.  I will make them again.  And, I am already contemplating turning Nora's top into a dress for the next go round.  That would be so easy, and so cute, and many a sewers have done it before me.  So I have lots of inspiration to draw from.

For the pant and skirt that is the Robert Kaufman railroad stripe.  It's kind of a canvasy type fabric, with a touch of stretch.  It's GREAT!  Wally's top is a solid Kona.  Nora's top is from the beautiful Waterfront Park line.

Hope I've been helpful!  Happy Sewing!!!


I couldn't resist...just one last one :-)

Sunday, January 12, 2014

A New Year!!

It's kind of hard to believe that the last post on MOM was in September of last year, but at the same time, it's not too hard to believe.  

I closed up MOM's West Coast HQ at the end of November.  My husband and I sold our little, teeny tiny house in Northern California and we've since moved to the South.  Not Southern California, but the actually South.  Georgia to be exact.  It was sad and a bit hard to say good-bye to our friends and life in CA, but the upside is that the basement at my parents is bigger than my house in CA, and we don't just have to stay in the basement.  Who knew space could bring such peace!?


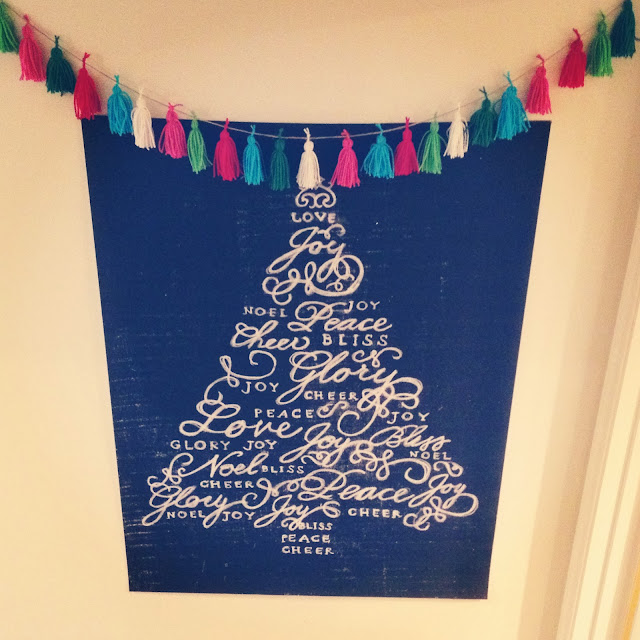
I've decided that even though we are temporarily here, I need to love where I'm living, so I'm decorating.  My mom has given me the okay to hang stuff up, so I've been nesting.  One of my only local friends, Summer, tipped me off to the Caravan Shoppe.  Have you heard of them? It's pretty great.  I've bought Olliblocks, chalkboard prints, and the nativity sets.

I added some yarn garland to my chalkboard prints.  I used Anna Maria Horner's tassel tutorial to make my garland.

I had an O' Christmas Tree for Christmas.


Then I got a geometrical heart for Valentine's Day.


I then, with the help of Summer, made a Silent Night Nativity.  This was one of my favorite things I've made in a while.  It was a bit of a labor of love, but totally worth it.


I also helped my kids to make these simple nativities.  They were so cute.


My yarn obsession turned in to making tons and tons of pom poms.  I've turned the pom poms into garland,


adornments for wrapped gifts,


and fake flowers.  I'm sure I'll come up with other ways to use these little fluffy things, so just wait and see what I come up with next!

Please note how totally messy things are in the picture below.  Totally keeping it real here.

Hank's room also got some needed decorations.  I made an "adventures await" banner and stapled an extra large world map to two stained dowels.  Now if only I could come up with a fun interactive way to actually use the map to teach my kids geography.  I'll google that when I'm done with this post.


This little skirt has been with us for 4 years in a row now.  I'd call that a sewing miracle!


Cookies were baked in the month of December.  Have you tried Dana's Gingerbread Softies?!  They will change your life.  I kind of want to make another batch and dip them in chocolate like she did.  So tasty!


Using Made By Rae's Parsley Pant pattern, I wiped out Christmas PJs for my crew in record timing.  This pattern is incredibly quick and super easy to sew.  I will say that it's a tad narrow on the hips and bum, so I would size up for Grace if I make them again.  George seemed to fit just perfectly in his size, but I have since made him a couple more PJs with the pattern and have lengthened them a bit.  All in all it's a great pattern.


On Christmas night I decided that I needed to cover the window of the door to the backyard from our basement flat.  I've loved this Anna Maria Horner fabric since it was first released as Garden Party.  However, I never bought any and it went away and I had come to grips with the fact that I would never own any.  Then she re-released the collection as Hand Drawn Garden, and I knew I needed to add it to my stash.  I think this simple curtain was a great way to use it, so that I get to enjoy the large beautiful print every single day.


At night we just untie the sashes and we have pretty privacy.  


I don't have the best pictures of my last creation, but it's been a favorite of Grace's.  Have you seen Frozen?  It's her new favorite, and she has the soundtrack and sings the songs all the time.  It's totally hilarious and sweet all at the same time.  Anyway, another hot tip from sewing friend Summer was this cape.


We were at her house for a playdate and Grace came down from Summer's daughter's room wearing a cape and said, "Mom, you need to ask Summer how to make this.  I really want my own."  How could I say no to that?!  The pattern is from Growing Up Sew Liberated and is super simple and produces the greatest little cape.  Love projects like this!  Nothing technically difficult about this pattern, but finding silky fabric 60 inches wide in the colors Grace wanted proved to be a little trickier than I expected, but I think I came close.


Grace wore this cape for an entire day, so I'd say that was a win.

I know Annee has some creations to share that will blow your mind, and I have a dress in the works, and a quilt all cut out, so you just might see an update again soon!  Tootles for now!
Related Posts Plugin for WordPress, Blogger...