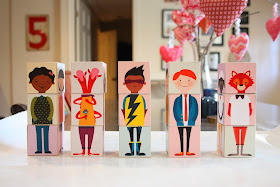
After moving to the South, I went to go and see my friend Summer who introduced me to the Caravan Shoppe. I talked about it in one of my previous posts, and I've seen their Olliblocks all over the internet, but I thought they would be too tricky or pricey to make. Then Summer educated me on how simple and inexpensive they were to make.
I think a normal person would have just done one or two sets of Olliblocks to see how hard they are and how long they would take. Of course I'm not normal, so I took on making 10 Olliblocks people (30 blocks). It was a bit of a labor of love, but seriously they are so cute and worth it.
I made two sets of the girls, the monsters, the superheros, the boys, and the animals. Each of these sets are a one time purchase (the starter pack includes the boys, girls, and animals), and then you can print them as many times as your hands desire to do all the many steps it takes to complete these darling blocks. On the Caravan Shoppe blog, they recommend using blocks from Craftparts online. I made one perpetual with blocks from Hobby Lobby, and quickly purchased 50 blocks from Craftparts because the quality of the Hobby Lobby blocks were horrible. I think I got a splinter from one of the blocks. My other hot tip is regarding Modge Podge. I was a school teacher many years ago, and I bought a bottle of Modge Podge that lasted me 4 years, and I used it for several different projects with my students. Modge Podge is to be used very sparingly. A little goes a long way. I've now made 40 blocks with the bottle I have, and it's still very full.
It was quite a site making all of these. Oh, and since I was already into this project pretty deeply, I decided to throw in making a perpetual calendar as well.
I love this little calendar and so do my kids. They like to change it. I think it reminds them of doing calendar time at school.
Then I tested out the blocks on my little one, and he thought these blocks were such fun.
I'm sad I didn't get his eyes in this shot, but I think you can see that he's totally loving the Olliblocks.
He's going to be so happy when he gets his own set.
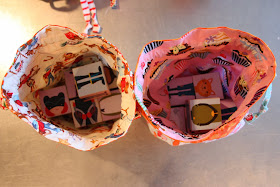
For Valentine's Day I decided that each of my kids will get 2 Olliblock dolls (6 blocks). I couldn't just give them the blocks, so I made drawstring bags. This was another hot tip from Summer. She's just full of good ideas! This was the Lined Drawstring Bag Tutorial I used, and it's fabulous!
This tutorial was crazy easy and fast. Once I had all my fabrics cut for 5 bags, I sewed all 5 bags from start to finish in 2 1/2 hours. That's pretty speedy. This was such a genius way of constructing a bag. I will definitely make more of these in the future.
I do 14 days of Valentine's for my kids, and I this will be day 14's Valentine. Now I only have 13 more to come up with. Thank goodness for Pinterest!
Sorry just a couple more pictures of the blocks because they are that cute and deserve a couple extra shots.
Off to trace an Oliver + S pattern. I only have 3 new ones to try, so I've got to get busy!


You have me NERALY convinced that I should jump on the bandwagon!
ReplyDeleteI guess I just want the blocks, not the whole job of making the blocks! Is that an option at The Caravan Shoppe??
You've been busy! Seriously adorable!
ReplyDeleteHi! Thank you for sharing! Where did you get the pattern for the drawstring bags?
ReplyDeleteHi Adrienne! I just updated my post with the link to the tutorial I used. Here's the link, too:
ReplyDeletehttp://www.incolororder.com/2011/10/lined-drawstring-bag-tutorial.html
They turned out SO CUTE! Love the bags too!! I totally need to learn to make those bags... and so many other things. Miss you!!
ReplyDelete