Thursday, January 28, 2010

One Yard Wonders: All-Ages Classic Jumper - *With Added Pictures

I finally got to use my One Yard Wonders book!


*Scroll to the bottom to see my model in this dress!*


Sorry, these pictures aren't the greatest. It's late and there is no natural lighting.


I started cutting out this jumper during Quiet Time in my house today. I had read the instructions prior to cutting, and out of the 10 simple steps I just couldn't figure out how the back was supposed to come together. I'm a visual learner, and there was no picture of the back of the jumper in the book. The instructions, without a better illustration, weren't all that I had hoped for.


I did a little google search, and found Amanda Sasikirana's blog , the designer of the pattern, along with a link to pictures of her darling little girl modeling a Classic Jumper. Seeing the back of the jumper was helpful for me, but I still wasn't sure based on the instructions how I was to assemble the straps, and I decided that I didn't want the criss-cross look on each strap in the back of the jumper I made.


I also found that for me it made more sense to assemble the entire front - top band and skirt - and the entire back - top band, straps, and skirt - and then assemble the front to the back.


As for my back, I made a casing for my elastic. I used 2 separate piece of material for the back band. (I made a 3T jumper, and the top band, front and back, was to be 5 inches wide when cut out. I decided to cut out 2 pieces 3 1/2 inches wide. I should have only done 3 inches because I ended up needing to redo my front top band to make sure the seams all lined up. )

Now for my instructions on how to attach the back band and straps!


First I attached the top back band and the straps to the back skirt, right side to right side with a 1/2 inch seam allowance. Then I pressed down the top of the back band a 1/2 inch.


Next, I attached my second top back band to the seam allowance of the first top back band, back band right side to back skirt wrong side. Then press the top of the second back band down 1/2 inch.


I then pressed both top back bands up, away from the skirt and enclosing the straps. The inside and outside of the back of the jumper are pictured above.


I then topstitched the top of the back band and the bottom. Then I fed my elastic through the casing, pinned it to the sides, and stitched it in place.


I then took the front of the jumper and the back, lined them up right sides together, and sewed up the sides with a 1/2 inch seam allowance. I then serged my sides, but you could just do a zig zag stitch instead.

I hope that helps! Good luck!


The fabrics I used are two Amy Butler prints from her Daisy Chain collection.


Add caption


I also added a coordinating band of fabric at the bottom of the skirt, matched the straps to the band, and added some MADE gathered pockets.


In the end, I'd give this pattern a 3 out of 5 stars. Unfortunately I really do not like doing buttonholes. They are so stressful! So I have to deduct a star for that, and then the back was slightly confusing. If I lived in Ohio, I would attend Amanda's sewing class, and then probably I would understand her method for adding the straps and closing the back.


I'm sure Grace will give it 5 stars herself tomorrow. She's girly and a new dress for a girly girl is a little slice of heaven on earth!


The next project needs to be cleaning my sewing space. I lost my favorite tiny pair of scissors a couple of days ago, and I still can't find them!! When I start losing essentials sewing tools, that means the sewing room is past due for a cleaning!


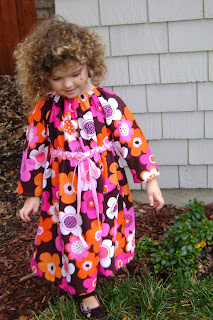
**This morning I showed Grace her dress and convinced her to be my model. Towels for a runway and some serious bedhead made for an entertaining catwalk. Oh, and probaby I shouldn't sew sleep deprived any more. I realized this morning that I read the instructions wrong on where to place the straps. They should be moved toward the center of the dress an inch. Oh well!!!!
Wednesday, January 27, 2010

Inspiration hits late at night.


I was perusing one of my favorite blogs, The Purl Bee, it's always beautiful at the Purl Bee. And the featured project tutorial was for some darling rose barrettes, made out of felt. Not being one who enjoys the process of making hair bows or accessories, these caught my fancy, and I really thought I might be able to pull it off.

But even more than the flower, I couldn't stop thinking about the wrap dress that the little model was wearing. I wasn't the only one. The comment section on the barrette tutorial was full of questions about the beautiful little wrap dress. I've been thinking about wrap dresses for some time now. They can't be hard to make, right?!

Well, because I wanted to make the barrettes, I had to try to make the reversible wrap dress too. Tell me that makes perfect sense!

Not sure if I was going to get it right on my first try, I had to use some fabric, that IF I did get it right, I was fine with, but if I DIDN'T get it right, I wasn't going to cry over the lost fabric. So I settled on this little floraly print, and decided, "Why not?!"

Here are a few pictures of my process, in case you want to try to make one too:


Picked a jumper that we already had, and liked the fit of. Traced it out on velum to start to make my wrap pieces.


Here I am making my first cut. My fabric was folded in half, wrong side to wrong side (very important), so that I would get my two front pieces cut out at the same time, in the same shape.


Here was the reversed fabric (or the lining depending on how you want to think about it). This was me cutting out the back piece. Fold your fabric in half, fold your pattern piece in half, cut one back piece out of each fabric, on the fold.


Here I am showing you the two pieces I had (after attaching the front pieces to the back piece) that I was going to sew together. But here is where it starts to get a little tricky, and here is where I had forgotten to sew the ribbons into the side seams, etc. So here is where my trusty tutorial probably ends. At this point I started pining and praying that I was heading towards some sort of workable finished product.

Sewing my two dress pieces together (right side to right side), I left an opening to turn the whole thing right side out, and I also left the top should straps unattached. I wasn't sure how I was going to attach them, but I knew it couldn't happen in this step. After getting the whole dress turned right side out, I struggled with the straps for a while, and then decided I needed to sleep on it. Perhaps inspiration would hit while I slept. Because truth be told, I was stumped. And frustrated.


In the morning I had Ruby try it on to see if it even fit well, and help me decide if I should even try to salvage it or not.


Seeing that the fit was cute, I decided to struggle on with the straps after the girls went off to school. After a whole bunch of top stitching, and two little lines of hand sewing, I think I got it.

I'll have someone wear it tomorrow and see if I like it enough to try it again. Next time around, I'm contemplating the merits of the reversibleness. Maybe it doesn't matter if it reverses, and it certainly would make the straps 1000 times easier to finish. We'll see.


Maybe not too bad for making a dress on a whim, late at night? Oh yeah, and I did make a barrette. I think it's beautiful, but it's obviously not as easy as I had dreamed it would be.


And P.S. Liz, despite our discussions about designer felt, I totally caved after seeing the beautiful collection of barrettes made on the Purl Bee. I now have a packet of designer felt on it's way to my mail box. I feel kind of guilty, but I couldn't resist either!

Monday, January 25, 2010

A Perfect Pillow

"Round of Applause to Anna" Pillow

A couple of months ago I bought a bundle of Anna Maria Horner fat quarters off of Etsy. I thought I'd collect the fat quarter and turn them into a quilt. As I started thinking about my original plan, I realized that I don't have a bed in my house that is in need of a quilt, so I've just had the fat quarters in my stash with no purpose in mind for them.

I've also had a picture of a pillow that has squares and circles quilted together, and I've thought for months that I should make a pillow like it. And then I merged the fat quarters with the pillow ideas, and the results are stunning if I do say so myself. I absolutely love my new pillow.


After making the top piece, I moved onto the back, and I successfully attempted putting a zipper closure in my pillow. This was one of the most reward sewing experiences I've had since I started seriously sewing about year and a half ago. It gives the pillow such a professional look. You can sew one into your next pillow by following the link "Put a Zipper in a Pillow" under "Tried and True Tutorials" on our sidebar. Huge thanks to Erin from House on Hill Road.


Then I place my front piece wrong sides together with my back piece and using bias tape I made, I bound them together like a quilt. Heather Bailey has a nice quilt binding tutorial should you need one.


This pillow was rather time consuming, but what isn't when you are sewing, and I feel like all the time put into it was well spent. I just love it! I've been wanting new pillows in my living room since before the Christmas sewing madness happened. One down, several more to go! Stay tuned!

Here's the latest...

Happy to report that the white sashing didn't ruin my day. In fact, it went quite quickly, and gave me a surprising amount of satisfaction. I believe that is due in part to the fact that before I attached the sashing, I trimmed all my blocks to perfect 8" squares. That gave the sashing a greater potential of turning out straight, rather than not straight. That was a very great tip. And by the way, I was following a wonky block tutorial that I found here.


(I give up on trying to get this picture to turn the right way!!!)


Of course, when it came to the back, I couldn't just settle on the pink (although it does happen to be one of my all time favorite fabrics!). AND, I was dying to try out this tutorial for making a wonky star block.

I would give this tutorial 5 stars, our of 5 stars. And, I would also add that should you attempt it, be prepared to have your pulse accelerate with jubilation as you see the star turning out, just as you hoped it would!

Two steps left on this quilt. I've still got to decide how it's going to be quilted. At first I was thinking some sort of concentric square stitches (but can I tolerate it??).

And finally the binding, which I think I've settled on, as long as I don't change my mind between now and then.

EXCITING.

Finally, because one project at a time is rarely good enough around these parts, I turned back to the "One Yard Wonders" book on Sunday night and decided that I instantly needed a "Folding Chair Pinafore Slipcover" (p.26)


There wasn't really anything instant about this project. In fact, it just got moved to a work-in-progress project. As I suspected from the outset, my folding chairs (which are wooden and purchased while living in Germany), aren't exactly the standard size. And though I measured them before I started, and thought it was going to work, it didn't quite work, exactly. But I'm not mad. I love the concept so much, so I'm going to continue working on it. I opted not to attach the little ribbons on the side until I make my final alterations.

In the end, I suspect 3 hours is too long to spend loosely slip-covering a wooden folding chair. But if I'm going to get critical about how I spend my time, probably a star in the middle of my pink fabric was again, a questionable way to spend a couple of hours.

As it turns out, sewing can become an addiction, and I may have a tendency towards addictive behaviors.

Let's leave it at that. But to be sure, this is not that last you will hear about slip covered folding chairs. It just isn't.

Sunday, January 24, 2010

A work in progress.

While eating way too many of these


I spent several hours this evening on my "Round of Applause to Anna" pillow. (All the circles are different Anna Maria Horner fabrics) I'm not going to lie, sewing 16 concentric circles was NOT A FUN TASK!! I thought by the 16th one I would have figured out how to make the circles look better, but I actually think the 16th circle looks just as lopsided as the first one. Thank goodness this picture is taken at night, inside, with artificial light so you can't see how off the circles really are. Tomorrow I will be attempting the "Put a Zipper in a Pillow" tutorial on our sidebar. Annee has done several of these, so I'm hoping putting a zipper in is less painful than the circle sewing tonight. I'll have more pictures and details on the pillow in a day or two once it's complete.

And I told myself I couldn't start on my pillow until the taggie on my Things To Sew list was made. Checked that one off the list during Quiet Time today. Seeing Annee's helped kick start me into making this today.

Now I must go and fall down in my bed!!

Friday, January 22, 2010

Babies are coming...

It's the season of baby showers here in Korea. Using one of my favorite Anna Maria fabrics, I threw together a little Appliqued Ribbon Blanket (see tutorial at side bar). Pretty easy, highly rewarding, always loved by mom and baby alike:

The back side is the pink minky fabric, which is hard to resist (and hard to deal with, so sewer beware!)

The next baby shower I go to, I hope I'll be bringing a completed quilt. Here are the sixteen blocks I have so far...


I used to think I hated quilting, because it's too precise. But having the freedom to combine so many fabrics in endless combinations is something that I love. More to come as this one works it's way towards completion. Happy to report the colors are making my LONG January a little bit brighter. Thinking about the 1.5" white sashing still waiting to be done is not equally cheery.

That's all I've got for tonight.

Wednesday, January 20, 2010

Anna meets Sandi

Dear Annee,


Last night I finished my Market Skirt with gathered pockets. I love the look of the skirt, and I thought some of Dana's finishes and ways to cut corners were genius. However, I was definitely glad I had a serger to sew this little number.


I combined one of our favorite fabric designers, Anna Maria Horner, with Sandi Henderson. The Sandi Henderson Vintage Pin Dot is one of my all time favorite fabrics. I just polished off my 4th yard of it. Looks like I'll be on Etsy later tonight to restock my stash. It's an essential for me.


After the the little ones were in bed, I made an Anna Flower to adorn a shirt to go with the Market Skirt. I love the look of the fabric flower, but I decided to make it a brooch and added a pin to the back as the tutorial suggested. Too bad the weight of the flower will cause it to droop when it's pinned to a shirt. I think I might turn it into a cute hair clippy. We'll see. I will definitely make this flower again. It looks fancy, but it was really simple to make.


Lastly, before I shut the gate on the sewing room for the night, I finished cutting out the circles for my next project. I'm so excited for this one. Stay tuned!


Love,

Liz


Saturday, January 16, 2010

Chic Everyday Dress


I found The Chic Everyday Dress pattern while searching for dress patterns on Etsy. I have loved and used The Sweet Little Dress pattern several times, and I wanted a similar pattern for the winter. A pattern that would have long sleeves and a little length. I knew I could always add length to any dress I choose, but I wasn't sure that I could construct a Sweet Little Dress with long sleeves successfully. While debating in my head what to do, I stumbled across this very inexpensive pattern. ManiMina has thousands of positive review, so before giving myself a headache figuring out long sleeves, I thought I'd give it a go.


Overall I was pleased with the Chic Everyday Dress that I created. I chose to do the size 5 dress because I wanted to make sure it was long enough, but I could have done the size 4. I also was disappointed when the instructions said that one yard of fabric would be enough to do a size 4 - 6 dress, but really I needed a yard an a half. Luckily I had 2 yards of lovely Woodland Delight by Paula Prass that I think fits my style - bright and bold.


I wish the sleeves flared more, but this is mostly my fault for choosing the larger dress size. I ended up needing to shorten the sleeves so they wouldn't be too long for Grace. By shortening the sleeves, I ruined the flare.


I omitted the ribbon and added elastic to the bias tape casing around the body of the dress like in the Miss Madeline Dress. I wanted a tie in the front because I thought it added a cute element to the look, so I used bias tape instead of ribbon. It felt like it would be sturdier. The elastic and bias tape combo reminded me of the waist on the Twirly Skirt by Erin at House on Hill Road.


This was not a difficult pattern to sew. However, if you are new to sewing or are attempting a dress for the first time, I would suggest starting with The Sweet Little Dress. The instructions and pictures in The Sweet Little Dress pattern will make sewing the Chic Everyday Dress much easier.

Thursday, January 14, 2010

My Own One Yard Wonder

Annee's been on a roll with the One Yard Wonders! You go girl!! My copy of the book is in the mail, and I can't wait to get my hands on it. Maybe it will come this weekend, and maybe I'll have a little extra time this holiday weekend to lock myself up in my sewing room and sew!


With the start of a new year, I decided that Grace and George's room needed a makeover. I haven't touched it since before Grace was born, so the theme was definitely girly, and it needed a more non gender specific theme since the two little ones have to share their space.


Anna Maria's Chocolate Lollipop fabric is being discontinued. While it's sad to see it go, there are several Esty shops that have her line on sale, so I was very happy to stumble across some reasonably priced Anna Maria fabric for $5.50 a yard! A real deal if you ask me! Imagine Fabric supplied me with this fabric which was my inspiration for the kids' bedroom.
With my treasured one yard of fabric, I decided to use it all up and make a window valance. I coordinated my Chocolate Lollipop fabric with a basic brown pin dot from my local JoAnn's so I could cut my yard into thirds to make my valance fuller. I used grommets to add a different element to the simple project. The grommets required NO tools which is huge. I've used metal grommets once, and it was a real chore getting them pounded in just right. I had to install 16 grommets which could have been a daunting task, but it went so fast since all I had to do was cut the holes and snap the grommets together. It was a snap! Pun intended!

I also adorned their room with a jute line to hang pictures and prints. Hopefully making it so easy to add and change the pictures will encourage me to keep the line updated often.
After a full month off of sewing, it felt so good to get back to my machine and create. I have a couple of gifts to make, so hopefully I'll be sewing again soon!

More wonders.

Review #2: Toddler Pinafore Smock Top

Okay, this pattern is totally simple! If you are looking for a quick project that delivers a great deal of satisfaction, start here!


I was somewhat undecided with what I wanted out of this little smock. Was it for my ladies? Was it a gift? Was it to look vintage, was it to be a modern interpretation? But I had these two coordinating fabrics, and exactly one yard of each, so I started here.


I could not resist the addition of a gathered pocket from the tutorial by the generous Dana, of "Dana Made It"


And the ruffle at the bottom occurred to me around 11:30pm right when I thought I was almost done. I was afraid it was going to be too short, and since my models were asleep in bed, I had to make an executive decision.

In the end I love the ruffle, and the pocket. I still think the fabric just isn't my favorite. It's a little too Laura Ashley for me to be in love with it. But the concept of the pinafore frock is one I think I can continue to get excited about and interpret again, perhaps with a more vintage flair.

Oh yeah, I sewed the size 4T. My girls wear a size 6 at Gymboree! The sizing is generous on this one.

And as a final note, that fabric is from Riley Blake Designs,"Bloom and Grow" by Mind's Eye.


P.S. Don't make any cutting errors, at least if you are making it in a size 4T. It really does use every last inch of your one yard!

Wednesday, January 13, 2010

One Yard Wonders begin!

Here is the first project I attempted out of the highly anticipated book, One Yard Wonders. It's called the Folklore Bag. I love the design. In fact, I've been eyeing a bag almost identical to it on Etsy since before Christmas. I nearly bought it for myself 43 times. But, I never did. Go check it out... Pretty similar, right?!

I guess I just learned how to save myself $48. However, I will continue to turn to her Etsy shop for inspiration on how to interpret this Folklore pattern.


The bag is bigger than I thought it was going to be, and bigger than the picture makes it look. If you line the bag with a contrasting fabric, this takes way less than one yard of your exterior fabric.


The pattern does call for a magnetic snap. I didn't have any, and didn't feel like waiting a week to get one to sew the pattern up. The addition of one will be lovely, but I think the bag works as is as well. However, if you want to order yourself some magnetic snaps to have ready when you make your Folklore bag, go here.


I wouldn't exactly call this a simple project. It definitely has it's set of challenges. I went online trying to find reviews of the pattern when I got to the point where you are supposed to attach the top bands. The instructions could have benefitted from a few more picture or illustration. And online I discovered that I was not the only one feeling that way about this step. In the end, I didn't follow the directions in the book. I did it the more intuitive way. It will make sense when you get to that point. But the bag was completed after a few hours of work, and can now be sent off to hopefully make one lovely friend very happy on her birthday!

I did discover along the way, that on Facebook there is a group called "One Yard Wonders", which I became a fan of. It looks like a great forum to go to when working with this book to find what other people are making, where they are blogging about it, and errors that people are discovering, etc. So here's a link to that too.

Seriously, technology is amazing. First of all amazing sewing books are getting published, with full pattern pieces. And secondly, online communities are instantly available for further information and learning to go in sync with the book you just bought. If that's not exciting, I don't know what is!!

Except that I've already started the "toddler pinafore smock top" ( on pg. 188) and because I just can't seem to help myself, I found the need to make a few additions to the already lovely pattern as it was. Therefore, it's not finished yet. Stay tuned for another update once my ladies wake up and can model the pinafore for me...

Monday, January 4, 2010

Krazy About Korea!


My one hope for Christmas Break 2009 was that I could finish my Krazy About Korea quilt. It's always a miracle when anything gets done around here. This is no exception. I love the quilt. In the end it measures 67x56. Perfect for curling up with on the couch. The fabrics are each memories in and of themselves. It will be my best souvenir of our years here in Korea. One huge time saver was when I decided not to cut the binding on the bias!! That was so smart of me. For one, I didn't have to waste so much fabric. And for two, it's not necessary with so many straight side edges. Overall I'm happy with the stippling done by the quilter off-base. But his stippling does tend towards a heart shape more than I would have liked. But doing it myself wasn't an option, so I'm not going to complain too much about that.

Krazy About Korea now sits proudly on the back of my couch and I've curled up with it two nights in a row now.

Here's to a bright hope that many projects get started and finished in 2010!! HAPPY NEW YEAR.
Related Posts Plugin for WordPress, Blogger...