Sunday, January 16, 2011
A Simple Baby Blanket
My little brother just had his second child, and I've been needing to make them something. I settled on a simple blanket, and I think it is the perfect little gift. You can never have too many blankets, and a personalized blanket is all the better. I liked the towels Annee made for her girls at the beginning of school, so I took her concept and turned it into a baby blanket.
This was a fairly simple blanket to make, and I say if you are a beginner you could make this, and you are an experience sewer (3 scissors as Annee and I would joke), you'd enjoy how fast and easy this project is.
The pictures for my simple "how to" are taken at night and during the day. This MOM couldn't keep her eyes open the night I started this project, and then got distracted during the following day. I do have two little ones who come first. Sew, please forgive the lighting in some of the pics. Here we go!
First cut out your top square 34" X 34".
Then cut out your bottom, same dimensions as top.
I used minky fabric. It's the furry/fuzzy fabric that you just can't help but reach out and touch as you pass them at the fabric store. I'm not sure what their official name is, but my kids and I call it minky. It tends to be pricey at JoAnn's ($12.99/yd), but JoAnn's always has coupons which makes it way more affordable. You could really use any backing you want. I was also thinking flannel would be a nice soft fabric for the back.
Next cut out letters to spell the name of the new baby. For letters I just used a font I liked in Microsoft, and blew it up. This font is Arial, 350 pt, and bold face.
Trace your letters on to double stick fusible web (Steam-A-Seam), cut out each letter and attach it to the double stick fusible web. Cut out each letter on the double stick fusible web.
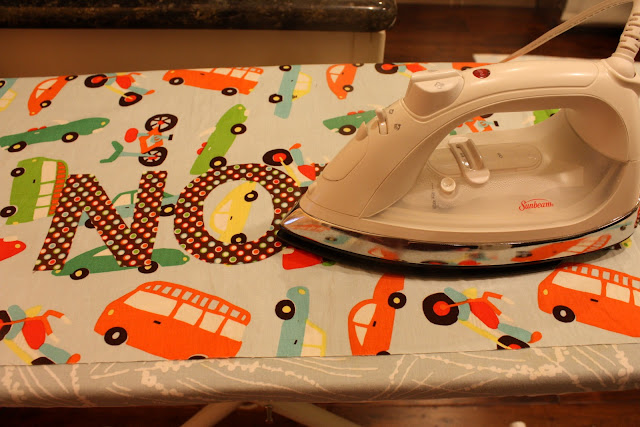
Then line up the letters where you want them on your square.
Then iron.
The top will now look like this.
Once the letters are secure, I zigzag stitch around each one. I didn't do a tight stitch, and you could probably even do a straight stitch. It will fray a little, but that's a fun look too.
Next layer your top fabric and bottom fabric wrong side to wrong side.
Use no less than 100 pins to keep them in place. If you are using minky I'm really not kidding. That stuff slides all around. I used straight pins around the outside and safety pins in the middle.
Then I serged my two pieces together. If you don't have a serger, you can just use a zigzag stick on your machine.
I almost think this could be a cute end to the project, but I decided it needed a little more pizazz, so I added a binding. I bound this little blanket like a quilt, but I did this entirely by machine. First I added my bias tape to the back of my blanket.
Next I ironed it in place on the front, and then I just stitched closely to the edge of the bias tape. For a good tutorial on quilt binding I prefer this one. Heather Bailey walks you through how to add the bias tape to a quilt starting on the front side of the quilt. I just reversed this process and started on the back and closed it on the front side, so that I could control the stitch on the front of my blanket.
Your simple baby blanket is done!
I think this blanket will be a perfect blanket for a baby to play on, or because it is fuzzy on the back it could be used as an extra blanket to cover them with while sleeping.
We didn't have a real baby model to help us with this picture, so Grace and I improvised with her baby. This will all change in a few short months. Also, all the quilter cottons I used are Wheels By My Minds Eye for Riley Blake. It is some of my favorite little boy fabric. Since I'm having a boy, you'll probably see a lot more of this fabric!
Subscribe to:
Post Comments (Atom)


3 comments:
what a gorgeous blanket, I love this. I've got some fleece (I bought cheap fleece throws at Ikea) in a lovely baby blue, wonder if that would work instead of Minky?
You are becoming a tutorial pro!! Hats off to you!! Nolan will love it.
Wendy, I'm sure the fleece would work and it would be such a soft backing. Great reuse of a cheap fleece throw!
Happy Sewing!
Post a Comment