Monday, March 7, 2011

Crayon Roll Bag Tutorial


The last little project that I wanted to sew for Baby Wavey was a Crayon Roll Bag.  My friend showed me one that she bought several years ago in Amish country, and I knew I could recreated it and put my own spin on it.  

If you are reading this, and know of a kid who is old enough to color, I promise they will enjoy one of these.  When I showed Waverly's bag to Grace, she asked if it was hers, so I told her I would make her one.  I then had to make both Grace and George a bag, and they played with them all evening last night, and then George crawled into my bed this morning and was carrying his new crayon bag.  I'd say boys and girls alike will like this easy, fun, and quick project.

If you've tried Annee's Bow Bag Tutorial, then this project will be a breeze for you.  Maybe you should make Crayon Roll Bag for your little ones and a Bow Bag for yourself.  Sounds good, right?

To make this you will need the following:


- 2 main pieces of fabric for the body exterior  7 inches long by 8 inches wide

- 2 main pieces for the body interior 7 inches long by 8 inches wide

- 2 pieces of heavyweight fusible interfacing 7 inches long by 8 inches wide

- 1 piece fabric for crayon holder 6 inches long by 8 inches wide

- 2 pieces of bias tape 12 inches long for handles

- 2 pieces of rick rack 8 inches long (optional)

- coordinating thread, iron, sewing machine, pins, fabric marking pen, pinking shears (optional)

- sewing gauge (optional, but very useful and inexpensive)

Let's get started!

First iron the interfacing pieces to both main body exterior pieces.


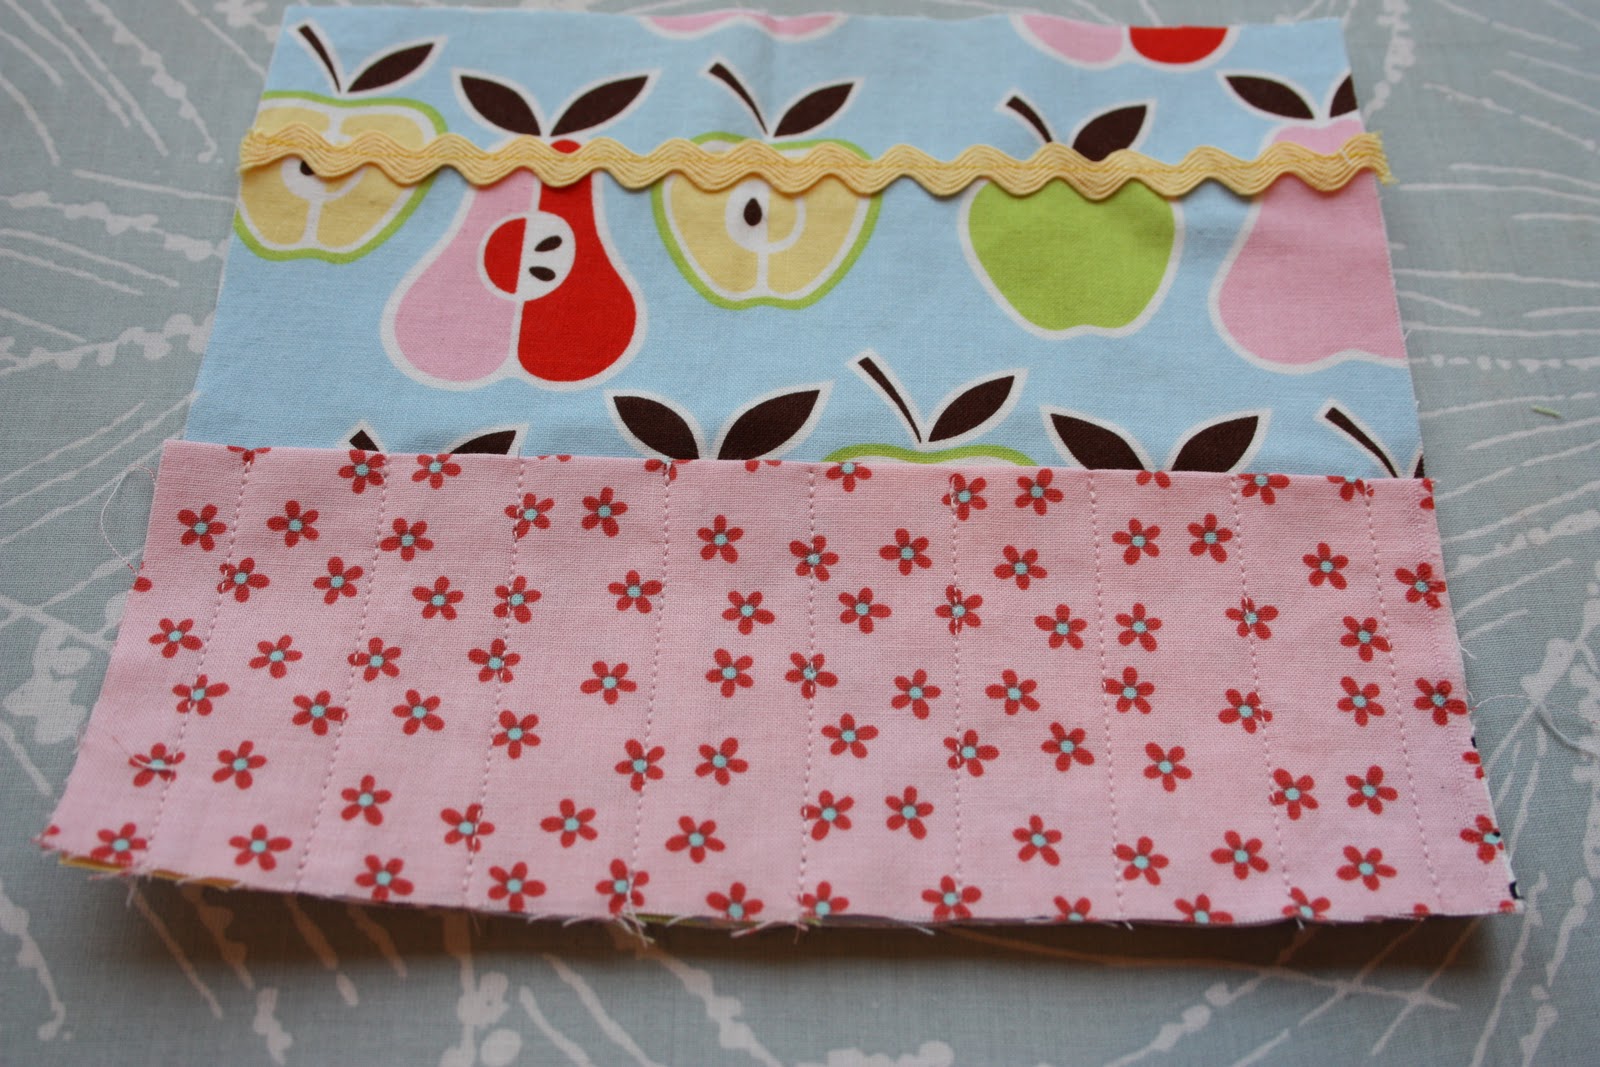
Next add rick rack if you are going to.  I added mine 1 1/2 inches from the top of the main body exterior pieces.


Then fold the crayon holder piece of fabric in half so the dimensions are now 3 inches long by 8 inches wide.


Sew a stay stitch along the creased edge.  


Now create your crayon holder.  Lay your crayon holder fabric piece on your main body front piece of fabric.  The stay stitched edge will lay closer to the middle of the main body piece, and all cut or raw edges should line up.


Then you'll need to create the crayon holder by marking where to sew lines to hold each crayon.  A picture will make these easier to understand.


You could mark your fabric with a fabric marking pen, or you could use pins like I did.  I put a pin 1/2 inch from each side.  This will be your seam allowance.  Then I mark every 7/8th of an inch for each crayon to have it's own little space.  You will end up with 8 crayon spaces.  A sewing gauge makes this very easy to measure and mark.


Now take your front main body piece of fabric and all the pins in the crayon holder piece of fabric, and sew all those lines.  Be sure to backstitch at the top (where the crayon holder fabric meets the main body fabric) because little hands can be rough at times.  

The hardest part is behind you!

Next assemble the exterior and interior of your crayon roll bag.  Place the main body fabric pieces for the exterior and interior right sides together.  Pin and sew around both the exterior and interior bags using a 1/2 inch seam allowance.


Next create the boxed corners for your bag.  On both the exterior and interior bag, open out both corners of the exterior and interior bag, measure a 1/4 inch from the tip, mark your measurement, and sew a line back stitching at both ends so the corners won't come undone.  Then using scissors or pinking shears cut off the tip.


Next zig zag stitch the length of both bias tape handles.


Then attach both handles to the main exterior bag.  Pin the bias tape to the right side of the main body exterior bag.  Raw edges of the bias tape should be matched up with the top of the bag.  I pinned my bias tape handles 1 1/2 inches from the edges.


Baste each bias tape handle 1/4 inch from the top of the main exterior bag.  


Turn the main exterior bag right side out, and the interior bag wrong side out.  Match up the bags, so that right sides are together.  Pin together.  Stitch all round the top of the bags 1/2 inch from the edge leaving a 2 inch opening between one pair of the handles for flipping.


Pull right sides of both exterior and interior bags through the 2 inch open, and then tuck the interior bag into the exterior bag.  (Sorry I forgot to take a pictures of this step!!)

Iron the top edge of your crayon roll bag, and then topstitch as close to the edge as you can.


Iron the little bag, find some crayons to put in the bag, stuff the inside with cards and papers, and make a little one's day!


I had Grace and George take their crayon roll bags to church today as their quiet bags.  (It was raining outside, so we just hugged the window for the natural lighting for these pictures.)


Next up:  I really want to make one last pillow for a shot at winning this pillow contest.  I have an idea, and in my head it seams to look cute, but it also seams like a lot of work.  I can feel my pregnant self creeping into my 3rd trimester and losing a bit of my steam.  We'll see where this week takes me.  I've gone through my fabrics several times today and have picked out fabric and put it back.  Usually my fabrics are so inspiring to me, but with this project I'm just not sure what colors to go with our fabrics to choose.  Sometimes having too many options isn't such a great thing!!  I'll keep you posted.

Friday, March 4, 2011

Make Believe


My mom has been here visiting us, and we've been having a blast.  While she's been here she's made a few request from MOM West Coast.  Funny, my mom knows how to sew, and she own a machine, but she'd rather I do the sewing.  I do love to sew, and sewing in the middle of the day while Grandma plays with my kids is heavenly, so I won't complain!


After the request of pajama pants, my mom wanted some little dish towels and wash clothes for her to use when she plays with my niece Waverly (my mom lives 5 miles from her and plays with her regularly).  Waverly is the little one pictured above.  She's 6 months older now, and she likes to play make believe in her little kitchen, so my mom thought it would be fun to have some mini kitchen linens for Waverly.


All of these linens were made out of scraps, and using up my scraps always makes me so happy!  I took one regular size dish towel, cut it into quarters and serged all sides of the mini towels, and then designed 4 simple kitchen towels.  If you don't have a serger, you could either use your zig zag stitch.


The big flower is my favorite.


Then I made 4 little wash clothes.  


I cut quilter cotton squares and placed them wrong side together with minky and then just serged them.


Now if you are reading this and you don't have a serger, don't worry.  You could simply use your zig zag stitch on the edges.  Or, you could always place the quilter cotton squares right sides together with the minky, sew all around it leaving a 2 inch opening on one side, flip it right sides out, and then top stitch all the way
around.


Grace and George enjoyed trying out the mini linens.


As I was making all the kitchen linens for Waverly, I then decided she needed a mini baby blanket.  I made Grace and George each one, and they both like it.  Again, I used only scraps, even the back was a minky scrap I found.


I used my Picket Fence Pillow tutorial for the quilt top.  I took the design and reversed it.  Instead of having the color in the middle, I decided to put it on the edges.  My thinking was that the mini blanket could be for a baby boy or a baby girl.  We like flexibility in this house!


Grace and her baby approved of the mini blanket.

I have one more idea for little Waverly.  My mom leaves on Sunday, so we'll see if I get more sewing time before she goes.  Fingers crossed!

Have a good weekend, and Happy Sewing!!

Wednesday, March 2, 2011

Pajama pants!


I promise I have more than just pants to show this week, but tonight I need to share two more pairs I've made.

For Christmas I made pajama pants for my mom.  While planning her trip to come and stay with us this week, she asked me to get her some "funky" fabric to make her two more pairs of pajama pants.


I bought two Tina Givens prints, and I used the Amy Butler pattern in her book In Stitches.

The results:


My mom is totally happy which makes me happy.  However, she told me she wears the pair of pajama pants I made her at Christmas in public.  Like to the movies and the grocery store!!!  If you live in GA, please tease her when you see Grandma Blanche walking around Publix in her pajama pants!!


I have some cute itty bitty things to share later this week.  Stay tuned!!

Monday, February 28, 2011

Breaking news...

My LOVE pillow is a finalist in the Sew, Mama, Sew pillow contest.  Today is the ONLY day to vote, so PLEASE go and VOTE!!!


All you need is LOVE


More celebrating of my BOY.


It all started last week when I made these cute pants for George.  Then I looked through the shirts that I salvaged from the Italian's giveaway pile, and decided that I could make George some new dress slacks with some old dress shirts.

These shirts to be exact.


The Italian wasn't too sure about the color of these pants, but I think my little boy was the best dressed at church today.  I mean I am a little biased, but I'm pretty positive you'd agree he looks cute.


I used the same concept that I learned from making Anna Maria Horner's Quick Change Trousers, so they are completely reversible.  Maybe George will wear these pants next week for a whole new look.  I used the AMH pattern as my guide, but I used the pattern pieces I made last Thursday.


I also added a little whale on the left leg because as I told you before my last name in Italian means "whale."  I wish I'd put the whale a little higher up on the leg, but my boy was asleep when I was sewing these pants, so I had to do some guess work.  Next time I'll know.

Grace joined George in wearing a handmade outfit to church today.  She sported her Bow Shirt and Pleated Skirt.


Grace really likes to model.  Hopefully she can pass along all her good poses to George.


I love that these pants were dressy enough for church, but cozy enough to play in.  I think that was George's favorite part too.


I'm loving celebrating my BOY.  I still have some more shirts waiting to be reused, so we'll see what the week holds.  My mom is here visiting and she has lots of requests, so who knows what's up next!
Related Posts Plugin for WordPress, Blogger...