Wednesday, April 27, 2011

Spring Cleaning Giveaway: SCRAPS!!

Ladies, seamstresses, and anyone who wants scraps, this is the giveaway for YOU!!!


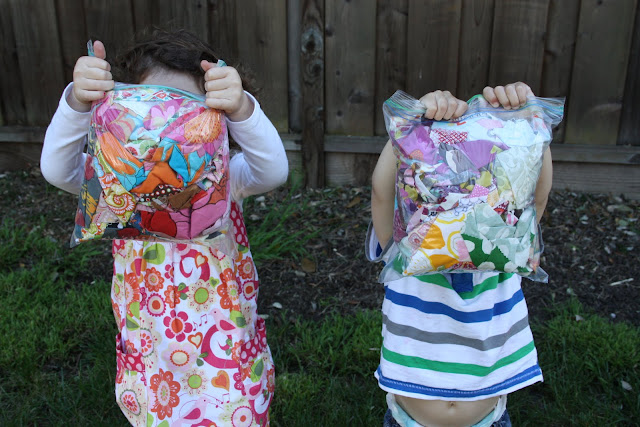
I'm in Spring cleaning/dejunking mode over here at Made On Maple West Coast.  I have baby #3 on his way, and in my small bungalow I need to make every square inch count.  I have lots of fabric and have sewn lots of things, and where there is lots of sewing there are TONS of scraps.  This pile is half of my scrap stash minus the 2 GALLON SIZE bags stuffed to giveaway.


My daughter is a little sad that I'm giving some of these precious scraps away.  She told me, "But, Mama, I can use these fabrics.  Don't give them away.  I can use them."  I'm sure you could,Grace, but not as quickly as some of our dear readers can!

Maybe you are wondering what to do with scraps.  I only have like a 100 ideas, but here are a few to get your wheels turning.


And, I could go on, but I have a feeling you've seen enough!!


Now that I've added to your sewing To Do List let's get down to business.  Here's how you can be one of TWO lucky winners of a GALLON sized ziploc filled with scraps:

*For one entry and one chance to win, just leave a comment!

*For two chances to win SCRAPS, then link our giveaway on your blog or Facebook page.  Then come back and leave a separate comment letting us know you did so with a link back to it.

*Anyone who has an address can enter.

*The contest will go until Sunday, May 1st at midnight PST.  Don't miss out!!


I will announce the 2 lucky winners on Monday.  Probably not first thing in the morning because making it to midnight these days is almost impossible in my state of pregnancy.  But, I promise to have the results posted by noon on Monday.  Does that work for you??

Good luck and happy sewing!!!

Monday, April 25, 2011

Easter Dresses

Without the Ladies:


With the Ladies:


The Details:

I ordered the Anna Maria Horner voile from Fabric.com.  I love ordering fabric from them, when I know exactly what I'm looking for.  You cannot beat their prices.

I used the Cottage Home FREE pattern called "The Party Dress".  I used the size 5, but added 1/2" inch of width to the bodice pieces, both front and back, and added about an 1" of length (also to the bodice).

I was able to order 1 1/2 yards of the voile, and used all of it.  I purchased 3/4 of a yard (per dress) of the dupioni silk at JoAnn's using a blessed 50% off coupon.  That stuff is expensive, there is no way around that.  Did I really just make them their first "dry-clean only" dresses?!

I loved the free pattern.  I was glad I had some previous dress making experience to rely upon.  I did make a few changes to the construction of the dress, which I knew how to do having made so many other dresses.  Before allowing myself to cut into the expensive fabrics, I required a rough draft version first.  I am not usually a "rough draft" kind of a girl, but it was the least I could do to preserve my resources.  I am so glad I took the few extra hours to do so!!  Totally worth it.  By the time I was making my third and final dress, I didn't even have to look at the instructions.


The rough draft will still get to be worn.  What a lovely bonus.  

The ladies loved all of their new dresses.  And I loved that they were done will ahead of Easter this year.  No last minute sewing this time around (okay, except for the purple sash!  I can't lie, that sash was finished ten minutes before she put the dress on)!

Now, the remainder of my week will be spent on quilt completion.  I hope you're getting excited :)

Friday, April 22, 2011

Easter Quilts


So I set out on the journey last week, to make two Easter quilts.  I did it last year, so why not this year??  And during the middle of the process, I thought I was totally crazy. Now that both quilts are folded neatly and hiding to be presented to Grace and George Easter morning, I'm so excited.  I almost as excited as they are about getting an Easter basket filled with goodies from the Easter bunny.

I discovered Crazy Mom Quilts a couple weeks ago, and I fell in love with the simplicity of the Flea Market Fancy Quilt.  I used her basic tutorial as well as Cluck Cluck Sew's Stack n' Whack tutorial, and in the end I'd recommend both tuts.  These girls know their stuff!!

For fabric I used mainly Riley Blake for both of these quilts.  George's has all Wheels by My Mind's Eye.


 and Grace's is a combination of Rainy Days and Mondays and Summer Song's by My Mind's Eye.


The back of Grace's quilt uses the same fabrics as the front,


 and George's back is just random fabrics that have been taking up room in my stash and needed a new home.


I was hoping to a cooler design on the back, but in the end I was more concerned with getting these quilts made by Easter, and they are the backs after all and won't be seen much, so I think a big patchwork is just dandy.  Please also note that I miscalculated how big long each patchwork piece needed to be, so I had to add a bit of white sashing to the bottom of the quilts.  Oops!


I did do Free Motion Quilting to quilt these twin size quilts together.  I used a stipple pattern, but if you were to look closely you'd see that it is so not perfect.  I think I like the stipple design because it is the most forgiving.  I look at my quilts from a far, and I think they look exactly how I want them too, but up close I can see where I could have done a better job.  But, I'd advise anyone to stick with the FMQ!!  I think the more you do the easier it gets.  Also, I really like the practical advice from Oh, Fransson! on how to do FMQ.  It's worth a read before you take on your next quilting project.  The best piece of advice (that I forgot when I stippled my quilts this time around) wind SEVERAL bobbins BEFORE you start.  My hot tip for you!  Just might save you from having to swear.

I also took a hot tip from Annee on how to bind the quilt.  It's getting late, and my mind is a bit tired, so I'll share that another day.  Just know that I'm so glad I talked to Annee before I started the painful last step.  It made all the difference!  Thank you, Sew Sister!


I also signed each quilt at the bottom while quilting.  Nothing too fancy, but just enough so Grace and George never forget who loves them.

Now on to making myself an Easter dress.  I have the fabric, I have the pattern, but I'm having mental sewing block.  I did also go to bed after 1 a.m. last night, so maybe that is affecting my comprehension skills at 9 o'clock at night.

I'm also thinking that my little baby boy needs a quilt.  I mean I just made Grace and George quilts, so I'm sure it will feel like nothing to make a baby size quilt.  Do I add that to my list of things to try to make before he's born, or should I wait until after he's here?!  Big decisions to make.

Signing off for now!  Happy sewing friends!

Tuesday, April 19, 2011

The Crazy Train

To those of you who thought we were neglecting our blog, shame on you!  Actually I'm sure no one was thinking that.  But, I'm checking in today to let you know that real life sewing is taking place like mad at both MOM East Coast and West.  Sew Sister, Annee, and I have been hard at work slaving away on quilts.  I love when we are working on similar projects.  It makes me work that much harder.  This blog was originally started for Annee and me to showcase our work from Korea to CA and back again letting each other know what we were up to in our sewing rooms.  When our worlds collide from far away and we are working on the same thing, it makes me feel like our sewing rooms aren't so far away.  I love how the internet, and our blog, make our distance not feel so great.


Back to what we've been working on...I'm in my final stages of two twin size quilts.  Let me repeat this.  I'M ALMOST DONE WITH MY EASTER QUILTS!  I feel like all caps is very appropriate for this announcement.  Yesterday was the first day of Spring Break, so we had nowhere we had to be.  I moved my sewing machine into the kitchen, turned on the soundtrack to Annie, and let my kids do arts and crafts and play while I stippled like a mad lady.

While George was eating his snack he told me, "Thank you, Mama, for making my quilt."  Totally worth all the work just for that sweet comment!

One of my quilts was stippled during the day yesterday, and then I started stippling the second quilt around 9 last night.  I got through the entire quilt except for one square.  One square!!!  Sadly, I ran out of white thread.  I went through 3 spools of white thread making these quilts, and unfortunately I needed just one more to finish up the stippling.  JoAnn's was our first stop of the day today, and now both quilts are completely stippled.

Now all I have left is the binding.  Shouldn't be too hard.  I'm feeling a little burnt out though, so we'll see if the binding gets put on tonight or not.  I'll be sure to keep you posted.


Over at MOM East Coast, Annee set out to make the Stacking the Odds Quilt.  A very appropriate name for the deadline Annee put on herself to finish this quilt.  Annee has the quilt top almost completely sewn, but unfortunately she didn't make her deadline.  She may think that is tragic, but upon hearing that this quilt required tracing the pieces a hundred times and then cutting them out, I'd say there is no reason to feel sad that this quilt didn't get made in time.  Annee should be very pleased with herself and how far she got!!

So, it looks like Annee and I are both current passengers on the crazy train.  I have a crazy idea of making myself a maternity Easter dress.  Now that there is light at the end of my crazy quilting tunnel, this just might not be the craziest thing I've ever done, but then again it's Tuesday and the quilts are NOT finished yet.

Another progress report coming soon!! 

Thursday, April 14, 2011

WIP Wednesday...on Thursday

I know the title is a wee bit confusing.  But you see, these pictures are really from my WIP that I worked on intermittently throughout my day today (Wednesday).  However, I do have wife and mama duties, and I needed to go to a movie with a friend, so you are not seeing my WIP Wednesday until Thursday.  Does that help clear up the confusion??


Last year around this time we took a trip to my in-laws while our hardwood floors got refinished.  My MIL has a sewing machine and has said I'm welcome to sew while I'm at her house, so the night before we left for her house last April I think I slept like 4 hours.  What was I up late doing? Cutting squares for quilts.  I got the crazy idea to make quilts for both Grace and George.  They turned out pretty cute, but sadly they were for toddler beds, and just a few months after I made these quilts we upgraded my little Gs to a twin bunk bed.

My little Gs being so helpful laying out the squares for their Easter Quilts.

Here it is April one year later, and I again got the crazy idea that I need to make my Gs quilts.  I'm definitely earning my ticket to the crazy train with this project because my goal is to have them done by Easter. That means 2 twin size quilts sewn, quilted, and bound in a week and a half.

So, WIP Wednesday will bleed into every day of the week until this labor of love is complete!!  Wish me luck!

Tuesday, April 12, 2011

Early Empire Cinch

My maternity wardrobe is a little bit of a disaster.  After I had George I gave away all of my maternity clothes along with all of our baby clothes.  And, for some reason I think maternity clothes aren't as cute as they were 3 years ago.  Maybe I haven't look hard enough, or maybe I'm kind of thinking what's the point because I only have 9 more weeks to go (that single digit number is a little frightening to me today!).  Luckily I have a very kind neighbor, Angel Amy, who has given me several items to bolster up my tiny collection, but pickings are still a little slim in my closet.

I've had 2 projects from the Anna Maria Horner Handmade Beginnings that I've been meaning to make for a couple of weeks.  The Early Empire Cinch was one of them.  I love when I can check something off my list, and last week I got to check this little number off my growing sewing to do sheet.  Check.


Now after wearing this cinch today I'm very pleased with how it turned out.  Last week I could not have said such nice things about it.  I had to use my seam ripper a couple times on it, and that always makes me feel like I have no idea what I'm doing and then I start to think the whole project is a waste.  Even if I finish the project, my sewing ego is a little beat up if I had to fix lots of my own mistakes.

These pictures were taken after I wore my new cinch for 4 hours.  Probably should have ironed it before taking the photos, but I was just trying to keep it real around here. 

But, after wearing my new cinch today I'm so happy with it.  I think it's the perfect compliment to my boring gray maternity dress. It adds the necessary color that I need in my wardrobe and my life.  


My cinch is reversible which means I now have 2 different options in the maternity wardrobe.  Perfect.  I'm also thinking that maybe, just maybe, I'll want to wear this even after I've given  birth.  I'm crossnig my fingers that I'll still love it after I say good-bye to my belly and hello to my baby.


Time will tell if it's an item that will last after my pregnancy, but for now I'm just excited to have something new to wear.  Now if only I could work up the courage to take on the Mariposa dress from the AMH Handmade Beginnings!

Again, keeping it real with the ladder in the background. Sweet.

Monday, April 11, 2011

Happy Birthday Weekend!

My little George turned three this weekend.  I would be really sad about my baby boy turning 3 if I didn't have another little one on the way.  I just can't believe how quickly time goes.  I mean 3 years just flew by.


In hopes of making all of George's dreams for his birthday come true, I let him help with the planning process.  I did make some suggestions, and for the most part George liked all of my ideas.


Super George


I was going to host a Super Hero Party, but I kept the party REALLY small, so I just called it a Backyard Birthday and ditched having to stick to a theme.  I did however make all those that attended a superhero crown because what kid doesn't like wearing crowns??


I also thought it was important for everyone to have their own birthday party favor bag for some little toys and pinata candy.  These ideas are always so good on the planning side, but during the execution stages I start to question my judgement.  I believe it was Grace who said it best the morning after I made all the birthday crowns.  She told me, "Mama, I think you accidentally made 6 crowns in one night."  In the end, I'm glad I made the simple little bags.


The only disappointing part of the Backyard Birthday is that George refused to wear his birthday shirt.  I mean he cried and cried and cried about having to wear it.  So he didn't.  Today is his actual birthday and he gladly put his birthday shirt today.  I guess he just wanted to wear it on his actual birthday.  My silly little rule follower.

Now that all the birthday excitement is over, I'm off to my next project.  More on that later this week...hopefully!!

Friday, April 8, 2011

I'm going to do it!

I went up to a new fabric store in Raleigh today, Wish Upon a Quilt.  It's been on my "to-do" list for months.  I took with me several pieces of fabric, never really knowing which project will emerge when you are in a fabric store.  I also took with me this inspiration picture that I've been carrying around for almost as long:


One day when I was unloading the dishwasher, I looked at the counter and saw that the bowls had randomly stacked in this order, and that I loved the color combo so much I took a picture.  I thought to myself it would make a beautiful quilt.

Then, I found a quilt pattern that I got really excited about.  Probably I got really excited about it because our local quilt shop had sewn up an actual sample and had it hanging in the store, and it was so very striking in person.  So I bought the pattern:


I've had two big pieces of inspiration that I tote along with me every time I go into a fabric store, just hoping that I'd get lucky, and find just the fabrics I needed.  Until today, it has alluded me.  But, when I walked into Wish Upon a Quilt, the friendly quilt staff was nothing but eager to help me bring my pieces of inspiration into quilt reality.  They started pulling fabrics left and right to help me sort through and find twelve that would work.

I think we did a pretty good job together, the three of us:


The blue is not quite as "blue", and the greens are a bit more subtle, but I am pleased as punch with my assortment.  I think it will do quite nicely.

Next up, one queen size quilt!  Yikes.  I've never made one that big before.

Oh yeah, on more thing I found on my way out of Wish Upon a Quilt today:


They had a charm pack of Sherbet Pips!  Of course I had to bring it home too.  Sadly it feels very wintery right now in the middle of April.  But maybe in July I'll be super excited about the cool colors and looking ahead to Christmasy sewing?!

Of course, first I will finish my color value quilt.  I have not forgotten my priorities.  That will be turned into a baby quilt to send off to another friend having a baby.

Thursday, April 7, 2011

Company in the Sewing Garage

Nothing like a new toy to get all inspired again.  First class in the mastery class was great.  Mostly it helped me realize how much I have to learn.  But that's okay, I'm okay with that.  I'm not so prideful to think that I'm going into a mastery class already at the mastery level!

On Tuesday afternoon when I got home from my class, and after the kids got home from school, Ruby had been invited over to a friend's house for a playdate.  My girls are in different classes at school, so they have different friends too.  I think it's good for them to venture out on solo adventures every now and again.  But we have a long ways to go, in terms of how the twin left at home often feels.  Jane was feeling a bit blue.  She told me she wanted to learn how to sew.  I should love that!  But it's really hard to be the teacher in the mother-daughter relationship.  I'm sure the teachee thinks it's really hard to have to listen to their mother so much.  We are all very independent women in this house!  But I decided if I could just reach deep down and pull up an extra measure of patience we might actually survive day one of Sewing 101, taught by Mom.

Here is the finish product:


"The Fish Bag"
Original design by Jane Dorothy Earnest


I tried my very best to let her design the whole thing.  She learned some really important skills like PATIENCES, sewing on buttons, how to sew a straight line, how to back-tack at the beginning and ending of a line.  Not too shabby for day one.  We both survived, and hopefully we even thrived a bit.  I know it won't be long before they are too independent to let me help them at all.  I guess I really just need to give them the sewing machine basics, and then just step back and let them go.  They can figure it out on their own, just like I did.  It might just be the best way for these sewing lessons to go.  Another compelling reason for a mom to have two sewing machines.  One for herself, and one for sharing :)

Of course, when Ruby got home from the playdate, Jane was quick to tell her how much fun sewing lessons were, and how she got to sew all. by. herself.  Ruby was instantly jealous, but before I had to go out for my second session of Sewing 101, she started throwing up!  Not that that's great news, but I knew I didn't have it in me for round two!  So Ruby got sick for the rest of the day and all through the night.  She didn't make it to school today either.  As a result, I got to have the whole day alone with the "other" twin.  As you can imagine there was some sewing involved (because as soon as she woke up at 10am, she was better)!


More buttons.  Little ladies must learn how to sew on buttons.  If they don't learn that, I have failed as a teacher.  

  
"The Ladybug and the Flower"
Original bag design by Ruby Lark Earnest

(But her bag doesn't get to get finished until she does something nice for her sister.  She was stubborn during one too many of their fights today!)

Friends, if I am making it look really cute to have twin daughters, then something is being lost in translation.  I mean, they are darn cute, but will it ever feel "easy" to be a mom?!  

In the midst of all the bag making, and daughter shaping, I had to have a little something going on the side, or else I might have lost my mind.  I was recently inspired by Rachel over at Stitched in Color with all of her talk about Value Quilts.  I was really intrigued by the idea that the fabric design doesn't matter, as much as the color value of the fabric.  I have so, so, so much fabric!  But the patterns can get overwhelming at times.  I wanted to try this method out for myself to see if it was true, that you could really ignore the pattern, and just focus on the color value.  

My friends, it's true.  Look what Ruby and I came up with today while she was home sick:

After cutting 6" squares in either dark values or light values, I started paring them up, one dark with one light.  Then you do what you like to do when making half square triangles, and after doing that over and over and over again, you have tons of square that you get to start playing with...

Variation #1:  Concentric squares


Variation #2:  Matching up the dark values according to color.  Ruby called this the "sorting" method.


Variation #3:  Random groupings, with the small square pattern repeated and the dark values in the center


My little partner:


I would say she got some really important lessons in emerging patterns, color values, and hanging out with your mother.  Homeschooling at it's finest :)

Now here comes the hardest part, which variation do you like best?  #1, 2 or 3???
Wednesday, April 6, 2011

Retro Duffel Bag

The Italian was suppose to take the kids to his parents house the past weekend.  Unfortunately my little George's ear infection from 2 weeks ago never went away, so we ended up back at the pediatrician's on Saturday morning for our second round of antibiotics.


BUT, before all the illness drama went down, I worked away on a Retro Duffel Bag for George to take his precious belongs with him to Grandma's house.  He requested a green bag when asked what color he wanted.  When he woke up at midnight Friday night in pain and with a fever, I had just finished the Retro Duffel Bag.  It was perfect timing because when I told him his bag was done he quickly got excited.  I love how easy it is to distract my kids.


He was excited and I was too.  I love the way the bag turned out.  The tutorial is well written and easy to follow, and the bag is very easy to make and comes together quickly.


George uses his bag around the house to carry all his stuff.  I'm hoping that soon he'll get to take his new Retro Duffel Bag on a very special trip to Grandma's house, so my pregnant self can have a weekend vacation at home!!  If I do get a weekend to myself, watch out.  I have big plans that included securing myself the prize for craziest friend that Annee has!  I'll will for sure keep you all posted!

Tuesday, April 5, 2011

Breaking it in.

I've been sewing on a Euro-Pro denim and silk sewing machine for the past 12 years.  It's been a great machine.  It was a gift from my mom when I graduated from college and she made sure that it was built with solid metal pieces.  It's been great.  But with the recent onset of sewing mania over the past few years, I could tell that this particular machine wasn't really built for 3-4 hours of daily sewing!  An upgrade was well deserved.

The world of sewing machines is vast.  It's hard to navigate and figure it all out.  I wouldn't have wanted an exclusive or fancy quilting machine because I love to sew clothes for my girls and need to be able to put little sleeves into little dresses.  Not all of those fancy quilting machines can do that.  And then, in the back of my mind I just had a feeling that no matter how much research I did, or how many quilting shops I visited, I would ultimately find my way back to Bernina.


It's really just the basic, entry level Bernina, the 330 to be exact.  But it has already out performed my old reliable, and that is simply impressive.  I will always love the old Euro-Pro and the journey we took together into the world of sewing.  But I can see that this new machine is going to help me keep going for many more years to come.  Not to mention how excited I am about the six mastery classes that come with the purchase.  The first one is tomorrow.  I'm really excited :)

To get familiar with the new machine before my first class, I decided to sew up a series of pillows for my oldest son Henry's new bed.  He inherited our old bed.  It's sort of a season for upgrades around here.  Anyway, while we wait for the bedframe to arrive, I thought I would spruce the bed up a bit.  He's entering those tween years.  He's half a year away from being 12.  Yikes!  He's grown past wanting a "theme" to his room, but I needed a direction for my little brain to create from.  He's the most avid reader I've ever met.  To see my son discover the world of books and reading, and love it maybe even more than I do, has really been something.

 I decided that "books" and "reading" would be my theme as I thought about what pillows to make for him.  I've long admired this Anna Maria Horner fabric called "Volumes".  I'd read somewhere that it's supposed to look like a stack of books.  That was the first fabric I ordered when I knew I was going to make new pillows for him.  


Anyway, here's what I came up with over the past few days.  I could add more, but let's be honest, he's almost a 12 year-old boy.  This is already about five pillows too many...


The finished ABC pillow (inspired by the Etsy shop called Pillow Factory) which is only on loan to his bed for now.  I love it so much I want one in every room of my house!


The confetti pillow is his favorite.  He was disappointed that it didn't get made in the bigger size.  I was scared of all those circles, so 20x12 was all he got.  Inspiration taken from the spring issue of Stitch Magazine.


And finally the "volumes" pillow.  Nothing very fancy about this one, except I did try for the first time doing an "invisible" zipper closure.  As you can see, it's not so invisible.  I will try it again for sure.  I can tell that if you could get good at this method, it might stand a chance at dethroning my all-time-most-used pillow zipper tutorial!


I followed THIS tutorial for the invisible zipper insertion.  I'm anxious to try it again soon.  


Until next time...
Related Posts Plugin for WordPress, Blogger...