Monday, January 31, 2011

My Very Own "Girl on a Tree Swing"

Sometimes you stumble across something on a craft blog that stays with you for a long time.  I can't even remember when exactly I found the Aneela Hoey- 'Girl on a tree swing' - mini quilt tutorial, but I haven't forgotten it since!  I've just been waiting to get brave enough to give it a go.  I was maybe also waiting to decide what colors to launch off from.  The biggest commitment on this project is deciding what color to make the background.


I recently purchased some Heather Ross-Far Far Away II fabric as a Christmas present (I'm still waiting to find the perfect project to use it on).  The shop I purchased it from included a little charm square of another one of her fabrics: 


Funny how a little tiny 5 inch square of fabric ends up being your jumping off point for a project like this.  I knew I wanted to include it in the background, so then I just started pulling anything that would coordinate with it. 


Close up of my swinging girl
Aneela's tutorial is so much fun!  It was intimidating to me at first because it involves a lot of free motion quilting with your machine.  I have done this with my machine, but never in the way that this project suggests. She does it as a form of drawing or outlining.  I was totally scared about messing up.  But how can you ever get better if you just don't risk it sometimes?!  Obviously, mine is not as awesome as the originals, bur for a first go-round it's not too bad.  I hope. 


I should be too embarrased to post a whole picture of my mantle because of the lame hole that we never fix.  But you know how you have something like that in your house, and over time you quit seeing it anymore.  Then I take a picture, and I think, "Um, we should fix that hole in our wall".  Anyway, I'm unabashedly posting the picture because I am charmed with the over all whimsical effect of adding the little swinging "Pip" to the mantle display.

Have you been following the hype about Aneela's new fabric line coming out this April, called Sherbet Pips?  I say April can't get here soon enough!  I'm considering even pre-ordering just to make sure I get some.

Anyway, let me recommend that you make yourself a little "Girl on a Tree Swing" mini quilt.  It was a most delightful project!

Friday, January 28, 2011

Pillows!!

By some standards I'm sure I have too many pillows in my house, but I love pillows.  Throw pillows in particular, but I'm pretty picky about the pillows I sleep on at night too.


This is my couch when I make it look all fancy right before my two little ones use my couch as a trampoline.  Love them more than pillows, but I do love the way my couch looks when it's all neatly decorated with my throw pillows.  I've made all of these pillows, and call me crazy, but I kind of want more.

During my Sewing Night earlier this week, I made 2 more pillows.  I used V and Co.'s tutorial for a Gathered Heart Pillow.  At first I was going to just make one for Grace to go with her new duvet cover (from Ikea), but then I realized George would feel left out, so I made him one as well.


I used Alexander Henry's Heart to Heart fabric for Grace's and Heartbreaker fabric for George's.  The Heartbreaker fabric is one of my all time favorites.  Unfortunately I can't find links to either of these fabrics.  I'll keep working on it!


Grace and George were thrilled to get new pillows and for the first time ever in their lives we went and made their beds within 10 minutes of them waking up.  It looked so nice to have their beds made so early in the morning.  I guess I should make them do that more often!


And, in other BIG and EXCITING pillow news, my Picket Fence Pillow was selected as a finalist in the Stitched In Color Blogger Pillow Party that I entered earlier this month.  I pretty much giggled like a school girl and called Annee right away when I found out that Rachel thought my pillow was one of the top submissions.  This news totally made my day today.

Now I just need to figure out what pillow to make for next months competition!!

Thursday, January 27, 2011

Everything starts with a vision.

In this case, it was Ruby's vision:


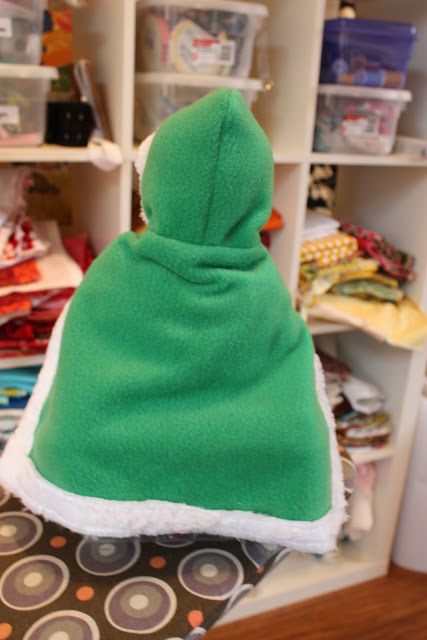
Ruby got a little Snow White baby doll for Christmas.  It's been rather chilly here in the South, and she has been feeling badly that Baby Snow White's outfit is really inappropriate for winter.  She came to me with this picture and asked me if I could make it.  It's taken a few weeks for the project to work it's way to the top of my list, but today was Snow White's lucky day!


Happy to report that baby Snow White is warm on the outside.  And Ruby was all warm and cozy on the inside, when she came home from school today and saw that her mama had "listened" to her.

As I knew she would, she asked me when I was going to make the dress that was also taped to her inspiration page.  Sadly, I am a little less eager to make the cocktail dress she designed.  Anyway, maybe I'll find a way to make it a little more, ahem, appropriate?

That's all for now.  Except to say, nothing makes me more proud, than using my sewing skills to make little people feel loved.  It feels most rewarding.

P.S. Yes, I'll be making a second one, Jane and baby Aurora felt rather left out.

P.P.S.  No pattern, just a few brain cells, tracing around baby Snow White, fleece, and an hour of my time.  You can do it too!

Wednesday, January 26, 2011

Sewing Night at MOM West Coast


Tonight I had a couple of friends over to do a little sewing.  We all had different projects going on, and it was so fun to have friends to talk to while working away.  I'll share more on what I made tonight once I get some better pictures in better lighting, but I do have a recipe to share.


These Chile Cheese Bread bites are so tasty.  Every time I make them I wonder why I don't make them more often.  You should throw your own sewing party just so you can make these.

The recipe is very simple:

4oz can green chili
1/2 cup room temperature butter
1 cup mayonnaise
1/2 pound shredded jack cheese
sliced baguette 


Preheat oven to 450 degrees. In a medium bowl mix green chiles, butter, and mayonnaise. Stir in cheese. Spread chili mix on bread slices. Put the bread slices on a cookie sheet and cook until bubbly.


Enjoy and good night!!

Monday, January 24, 2011

There is no place like...


I've decided that this is my new favorite view in my home.


Maybe even step back a little bit more and take in the whole view of the front of my home (minus the coffee table that doubles as a train table).


I really do think there is no place like home, and even though lots of days I wish I had a bigger home, I love where I live.  I love it.  I'm also loving my grown shrine to Anna Maria Horner.  I should probably email her and tell her how much I love her fabric and everything she creates.

After I made my Hoot Wall Hanging, I felt like the area on the left of the front window of my home looked bare.  It just needed something.  I had an idea of buying fabric letters with all the initials of the members of my family from Anthropologie and hang them in order by age.  Too bad Anthropologie is basically all sold out of their fabric letters, AND we haven't decided on a name for our new little bundle of joy coming in a couple of months, so that idea went out the window.  (Well, out the window until Anthropologie restocks and we decide on a name.)

So I went back to the drawing board in my brain, and I had the thought of this cute pillow Annee made many months ago. I alway liked it, but I don't have a real need for new throw pillows.  Then I realized I could take the wonky house tutorial and turn the quilting technique into a wall hanging.  

Seriously close to 10+ hours later, I hung up my Home Wall Hanging.


Who knew that make a border for a circle could be so hard.  I used all my new Anna Maria Horner Innocent Crush fabrics to make this wall hanging hence the growing shrine to my idol.


I also tried another stitch on my sewing machine and added some detail to the border fabrics.


In the end, I'm 95% happy with my Home Hanging.  If I had to do it all over again, I'd probably change a thing or two about the wonky house, but for now I'm just happy to have something new adding color and happiness to my home!

Coming Back.

When Christmas is over, for a while you're so excited to clear out your house of all the extra decor.  But after a while, I started to miss the festivity of the holiday decorations.  Valentine's is certainly a second tier holiday, but still sufficient to craft a heart garland, and hang it up early in January in anticipation of the day of love!  I know Liz feels the same way.  Heart garland is so simple.  You just cut out a million felt heart, and chain stitch them all together.  It is one of the most satisfying ways to spend an hour.  Trust me!


Perhaps you noticed on our "Things I Want To Make" list, that I had recently added "love note" to the list.  I was really smitten with the cute one I saw over at Flamingo Toes.  Somehow I feel like mine turned out a bit more dorky, and I'm on the fence whether I like it, or I'm embarrassed about it.  But I spent the entire week last week substituting in 1st grade, which left NO TIME for sewing even two stitches last week.  I was eager to get back out to the sewing garage, and you have to start a come-back somewhere.  


To redeem myself after my somewhat dissatisfied experience with the "love note", I decided to make myself a little gift for having survived a really busy week!  I've been admiring Liz's recent entry into the world of clutches.  She's really been doing some cute projects in that realms.  Now that I no longer have the need to tote around extra stuff for kids, I've been dreaming of a hands free way of carrying only the essentials as I breeze through the grocery store, etc.  I knew I could figure out how to attach a handle to any of the clutch tutorials out there, but long ago I found this pattern, and I couldn't get it out of my mind that I wanted it.


The pattern is lovely.  The first time you make something is always the hardest.  I look forward to making this pattern over and over again.  It comes with six different bag style/sizes, and about six different handle ideas.  It's great.

Of course, the fabric steals the show in my humble opinion.  New from the Anna Maria Innocent Crush line, it is my favorite one!

So far I am not scheduled to substitue at all this week.  Here's to hoping that I get to spend a lot more time creating!

Thursday, January 20, 2011

A baby gift


I had a baby shower to go to tonight for Baby Joe.  I whipped up this cute little appliqued ribbon blanket last night.  This is a very easy project.  Anyone could handle this!!  My mom did NOT teach me to sew when I was growing up, and I actually showed her how to make these, and now she makes them for the babies in the hospital.  I originally followed THIS tutorial which can always be found on our sidebar under "Tried and True Tutorials" beause we believe it is that good.

I used another Riley Blake Wheels By My Minds Eye.  It's just the cutest fabric line for little boys!  I also used the same minky for the back that I used on my Simple Baby Blanket.


Try one.  You'll like.  And any expecting mom will be so pleased to have one for her new little baby.

Have a great weekend!  I'm hoping to get a new dress sewn for Grace before Sunday.  Fingers crossed.

Blue Bear couldn't be left out!


After capturing George's sad face yesterday, I quickly whipped up this little blanket for his Blue Bears last night.  (We have two because he's had the worn out looking one since he was 3 weeks old, and we need a back up just in case something happens to his precious little friend!)  The Italian saw George find his new little blanket all staged with his New Blue Bear outside his bedroom door this morning.  The Italian said he was pleasantly surprised and excited when he saw the mini blanket.


This little quilt was easier than the Picket Fence Pillow mini quilt I made Grace.  I free hand cut all the colorful fabrics, and then without pinning (sometimes I really don't like to use pins) I just sewed them all together.  Then I added some faux linen to the sides.


After choosing a fabric for the back, I added a piece of quilt batting between the two layers and did a couple of quilting stitches to keep it all in place.  I then finished it with binding it by machine.  This was such a fast project which is my favorite kind!


The dog stitch is my favorite.  George thought the dog was pretty funny and will bark like a dog when he shows you the little line of dogs on his quilt.


Knowing that my sewing can make my kids smile makes sewing that much more enjoyable for me!

Tuesday, January 18, 2011

A Blanket for Little Bear


After I finished sewing the Picket Fence Pillow Top example last night, I left my night's work on the table in the kitchen.  When Grace woke up this morning she found it and wanted to know what it was.  She was wondering if I'd made it for her.  I told her it was part of a pillow, and she seemed a little disappointed that it wasn't something for her.  Not that she needs anything, but when I saw she was a little bummed it got me thinking.  I mean I don't need another Picket Fence Pillow, so what could I turn it into that a little girl would get excited about.


I decided on a mini blanket for her Little Bear.  I chose a fabric for the back, quilted everything together, and then used my sewing machine to add the quilt binding.  


Grace was so excited.  Unfortunately, George felt a little left out.  I had him choose some fabric, and I told him I'd make his Blue Bear a blanket.  Looking at his face in this picture I'm not sure how I can go to sleep without making him a little blanket.

I must get back to George's mini blanket so I can rest easy tonight!!  I'm almost done!

Is anyone else up late sewing???

Picket Fence Pillow


On my street we have lots of different fences, but there are two picket fences that catch my eye every time I pass them.  


They just have a unique charm about them.  The homes that go with them are equally as charming, and while I can't put up a fence by myself, I can sew something that looks like one, so I give you my take on a Picket Fence Pillow.


Picket Fence Pillow Front


Picket Fence Pillow Back


After I made my first Picket Fence Pillow, my mom emailed me requesting some pillow for her house.  I live in California and my mom lives in Georgia.  I get to see her quite often which makes the distance not so painful.  Knowing that my mom has my creations in my House in the South makes me feel a little closer to home, and totally loved by my mom.  She bought the chair above from Pottery Barn, and I told her to mail me the cover to the pillow.  She did, and I combined the material from the cover with my quilter cottons, and made her a Picket Fence Pillow.

I'm entering this pillow in the Bloggers Pillow Party at Stitched in Color.  Check it out!


Blogger's Pillow Party


We've had some requests here at Made On Maple for a  Picket Fence Pillow tutorial.  We try to make our readers happy, so here goes!  My only warning is that I don't really make exact cuts or measurements for this pillow.  It is a very whimsical process. *Note inspiration pictures above.  They fences I like aren't uniform, and neither are my fabric pieces, and neither should yours be!!

The cuts of fabric you'll need are:

*Main fabric (in my tutorial they are the pink ones) free hand cut strips 8" to 10" long by 2" to 3" wide - You will cut as many pieces as you need to cover your pillow.  I also use all quilter cottons, but you could use any kind of fabrics.


*Border fabric (in my tutorial they are the light linen color) free hand cut strips 7" long by 2" to 3" wide.  You will need DOUBLE the amount of these strips then the main fabric strips.  If you cut 10 main fabric strips, then cut 20 border fabric strips.  Make sense?


*Piece of quilt batting cut to the size of your finished Picket Fence Pillow top

Let start sewing.  

First sew border fabrics to main fabrics.  You'll layer them right side to right side at the short ends.  Sew together using a 1/2" seam allowance.  You'll make a strip that looks like this.


Continue sewing border fabrics to both short sides of each main fabric.  Once you are done press all seams open.


Now lay out your fabric *slats* (that a fence term for you).  This is the design step.  Arrange your slats however you want.  I just try to make mine look as asymmetrical as possible.  Think whimsical.


Once you've positioned all your fabric slats, sew the slats long sides together.  Now I use anywhere from a 1/4" seam to a 1/2" seam.  Sorry to not be more specific.  

I take each slat right side together on the long side and sew it.  I don't even use pins.  You can if you want, but don't feel any pressure from me!


Once all the slats are sewn together, I press all the seams open.  You could do this after you sew each slat together, but I feel like I'm more efficient if I do it at the end.  


Your Picket Fence Pillow top piece should now look something like this:


Don't bother cutting all those strings.  You'll do that in the next step!  And yes, I sew in my laundry room and I use my washer and dryer as my sewing table.  I love my little home!!

Next you'll want to cut down your Picket Fence Pillow top to the size of your pillow form.  At the end of this tutorial, I'm going to link to my favorite closure for pillows.  The author of the tutorial will tell you to cut your pillow top a 1/2" bigger then the height and width of your pillow form.  For example, the pillow forms I've used to make my Picket Fence Pillow are 16 X 26, so I cut my Picket Fence Pillow top to 16 1/2" X 26 1/2".


Now comes the quilting part.  Here's a little hot tip for you all.  Annee shared it with me, and I'll share it with you.  Invest in some quilting adhesive. 


It works miracles.  Just spray a little on your batting, smooth your Picket Fence Pillow top over the batting, and voilĂ !  It sticks!  This makes quilting so much easier.  You don't have to use pins or worry about your fabric moving all around on your batting.


Next I quilt my top by simply outlining the slats.  It is fast and easy and I think it looks lovely.


You are done!  Well, you're done with the top, but the back is really simple.  Just follow the link below.


Use THIS tutorial to add a zipper closure on the back, and then you are really done and your pillow is ready to adorn your couch.


Related Posts Plugin for WordPress, Blogger...